Updated 2020-01-21 to add: Check him out on YouTube!
My brother Isaac bought a 2004 Ford Econoline van and
converted it into a camper.

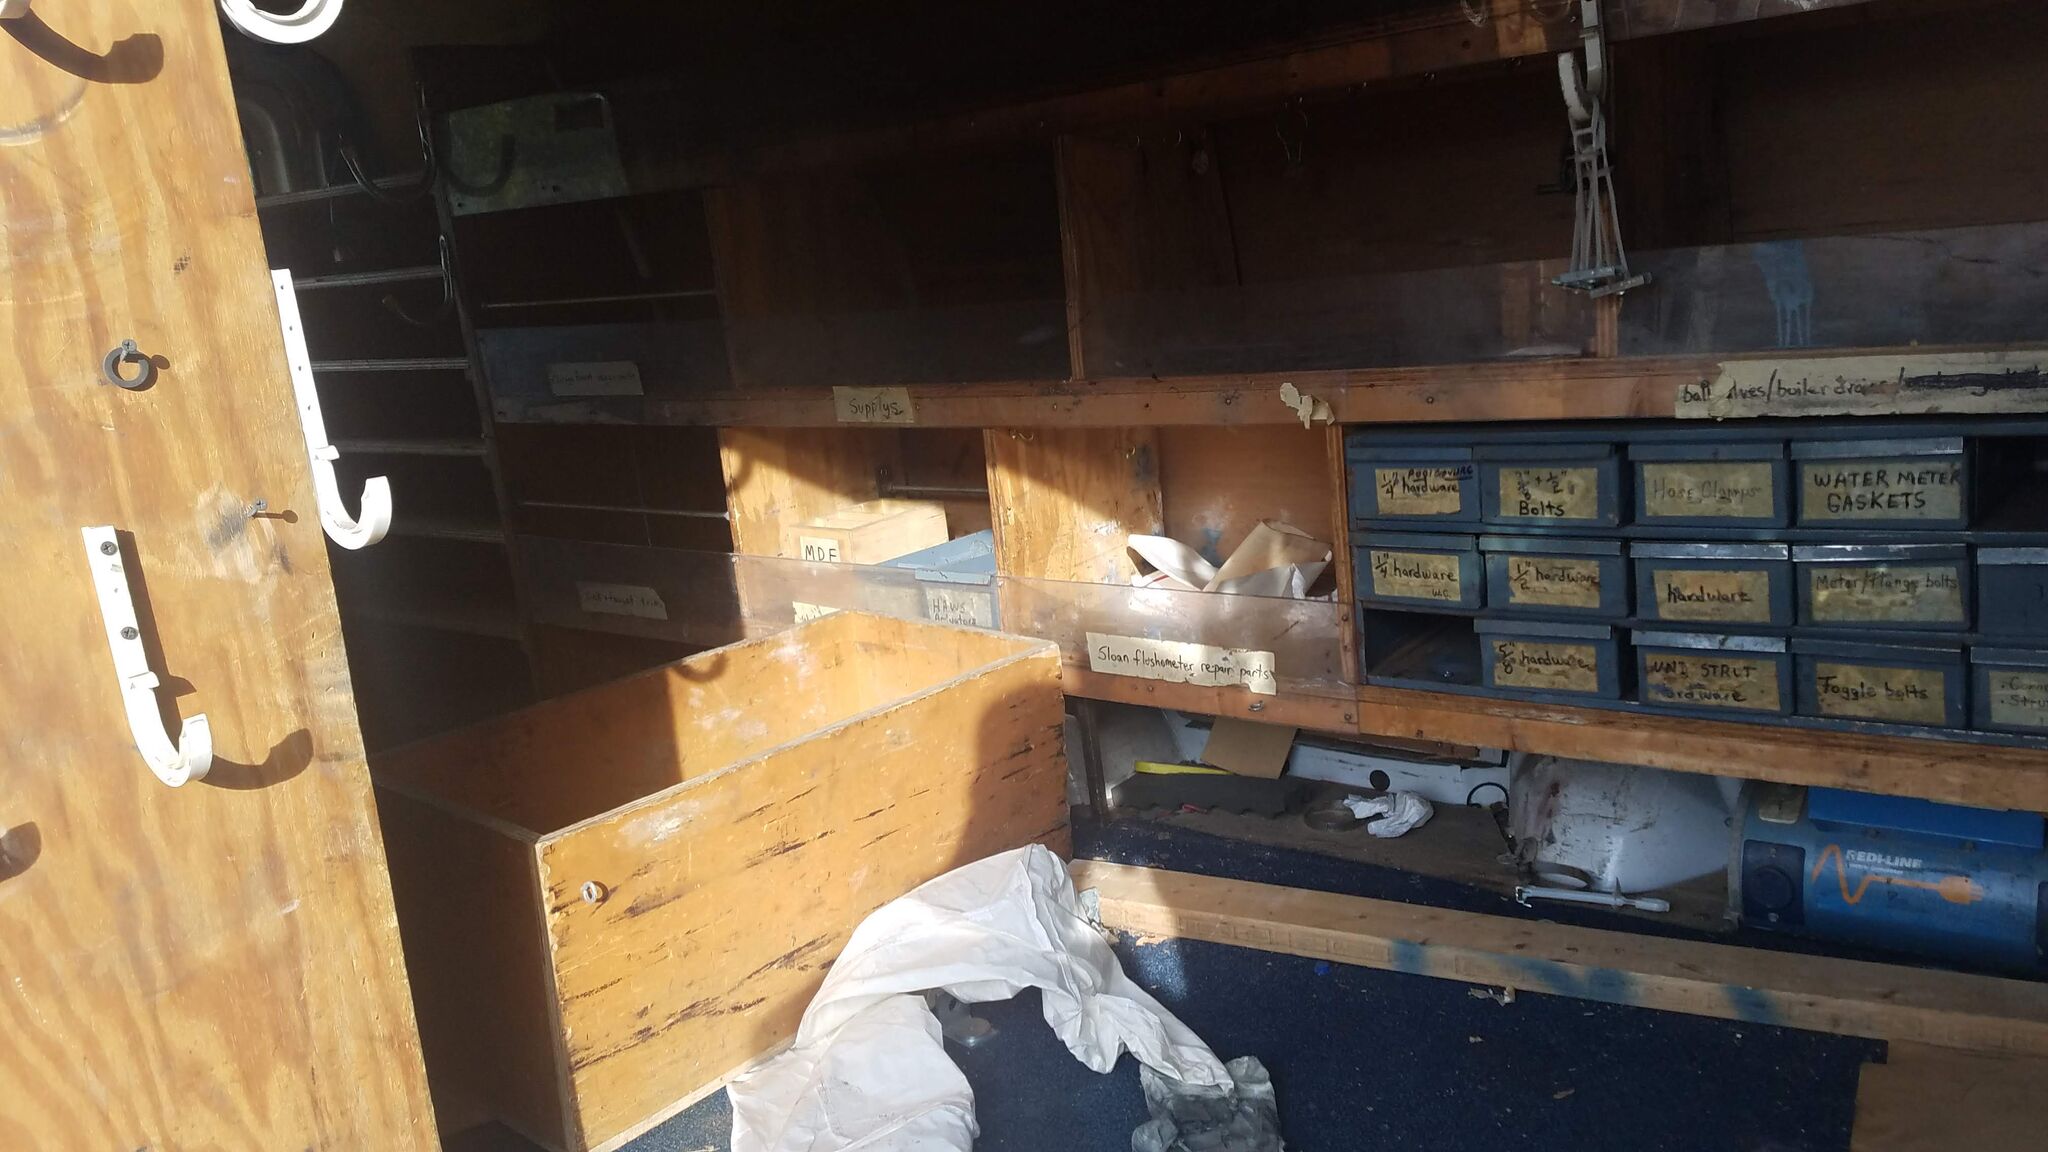
Before:

After:
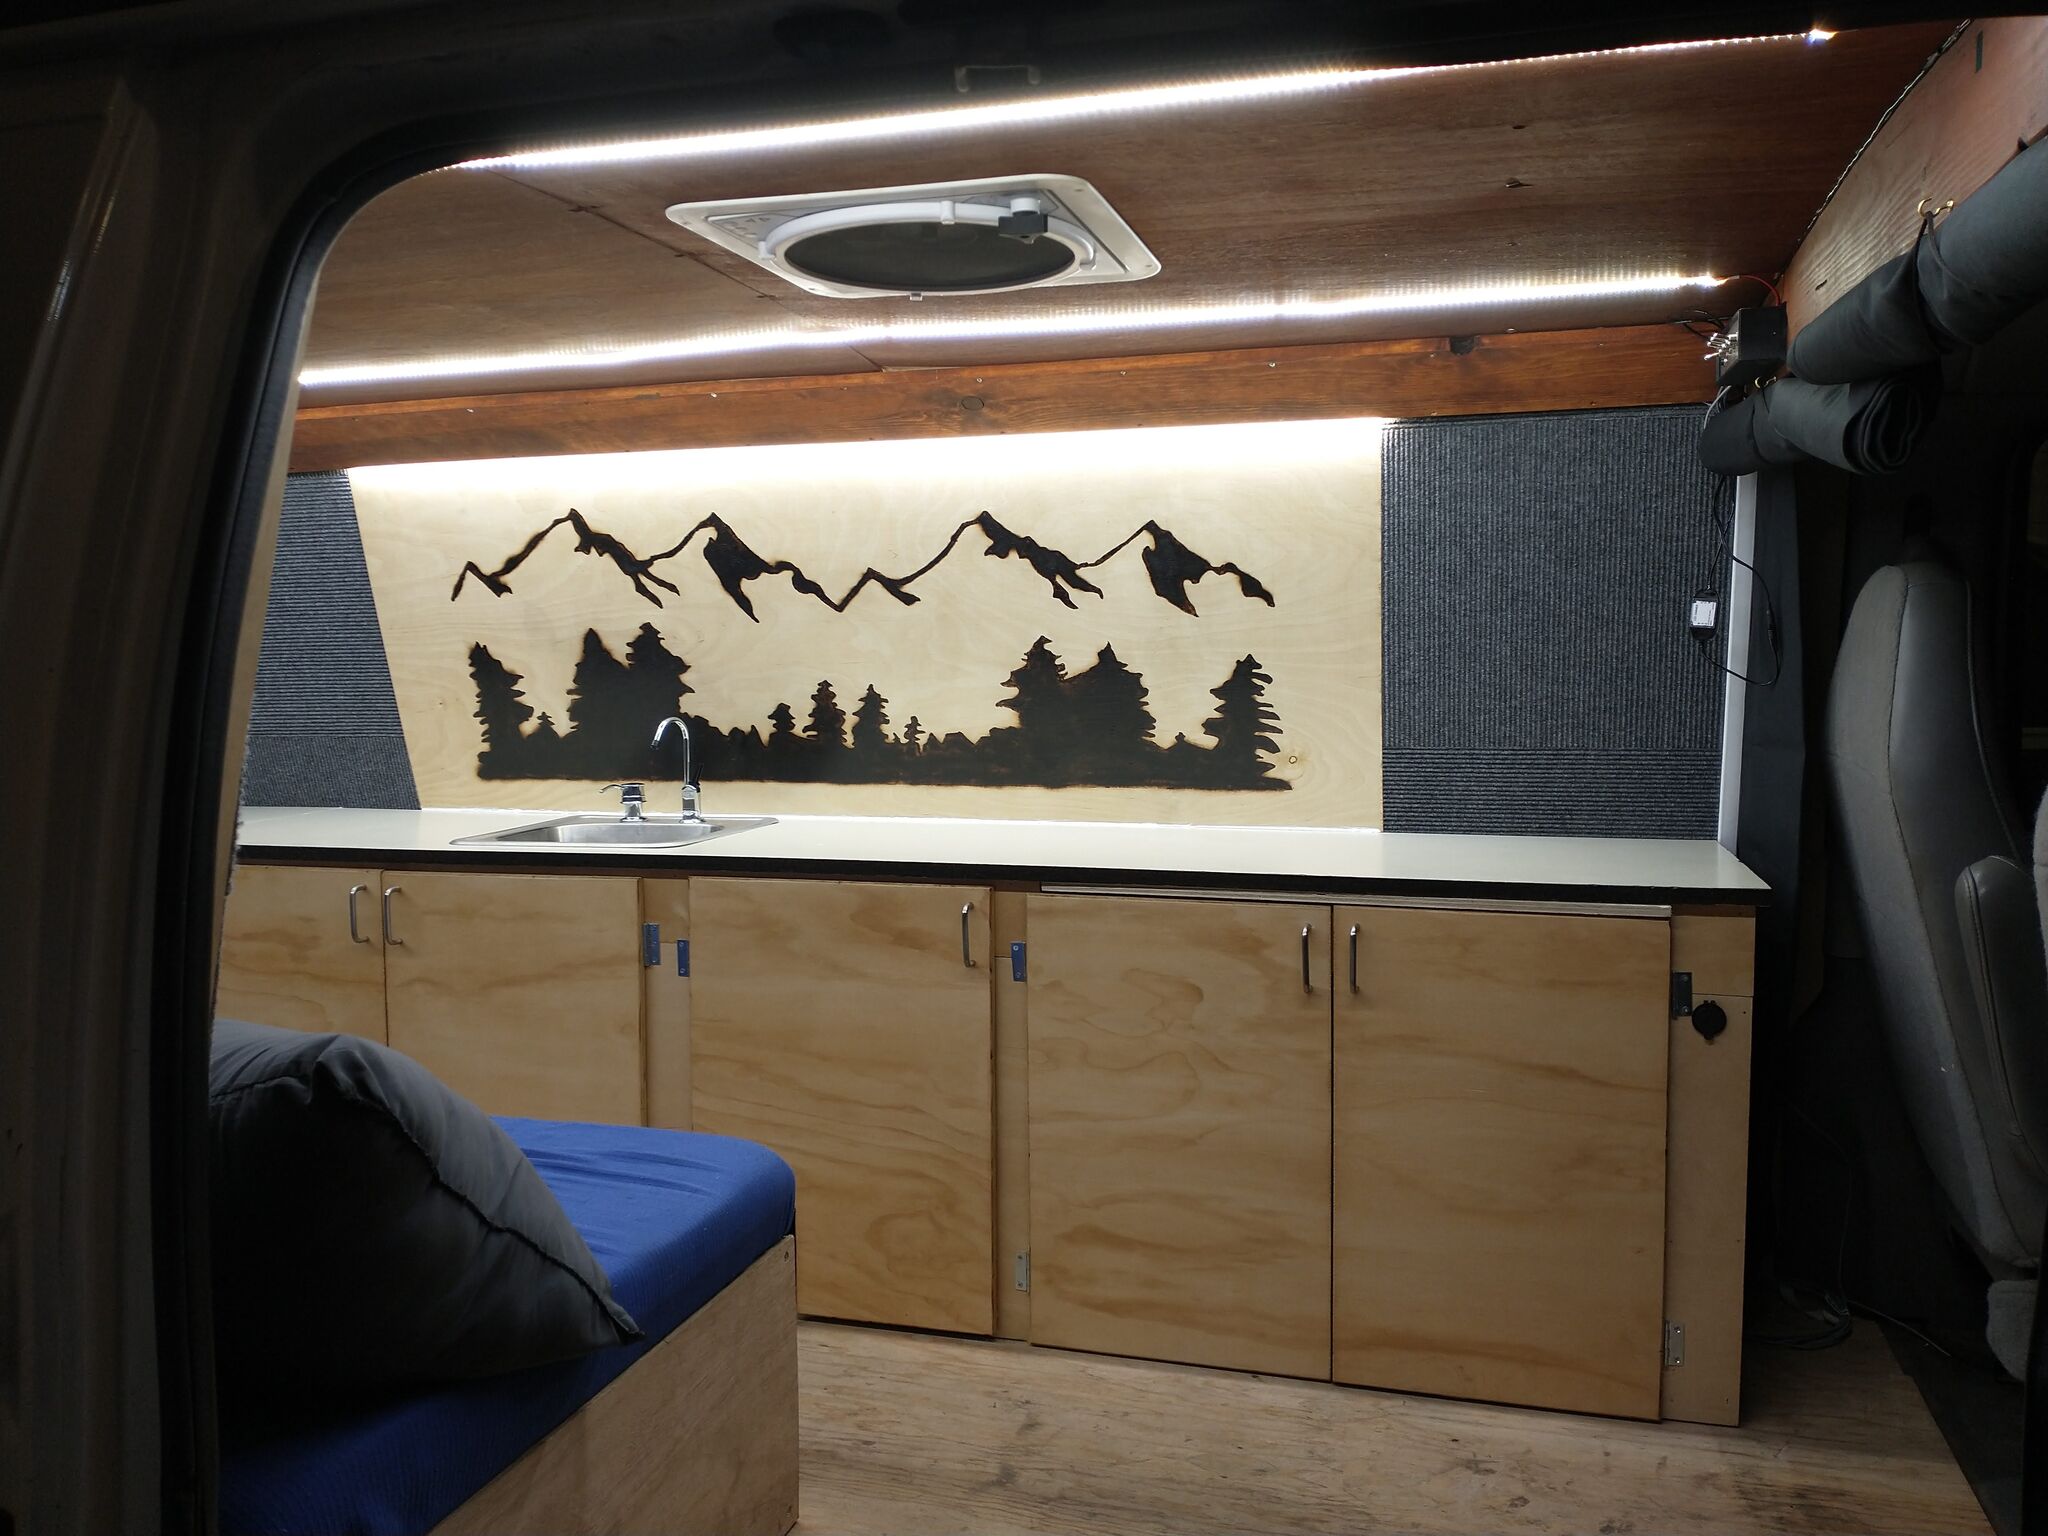

He did a stunning job with the physical functionality (gutting the vehicle, adding walls and insulating, building countertops, cabinets, a bed, etc.), but asked me for some help with the electronics.
He expects that he’ll be on the road (and therefore charging the battery from the engine) daily, so he doesn’t need more than a day’s worth of battery power. This also takes solar panels out of the equation. Power needs are generally pretty minimal: lights, a vent fan1, and charging for his phone and laptop.
I’ve listed the parts I purchased to make this happen, and the prices I paid at the time. For the most part, these worked well; exceptions are noted.
Lighting
The first thing we installed was the lighting. I’ve had reasonably good luck with a variety of adhesive backed LED strips, but wasn’t quite sure which variant we’d want here. We do want something reasonably bright, but also something that doesn’t take too terribly much power. The back of the van is just over 10 feet long, so I ordered 2x 5 meter warm white LED strips with 120 LEDs per meter. We cut them to length, and put one on each side of the ceiling along the length of the van. I was pleasantly surprised at how nice these looked. The adhesive stayed stuck quite well (although we did use a staple gun to make sure they’d stay put despite road vibration under a variety of conditions), and they were very bright. With all the lights on we consume almost 15A though, so it’s not practical to leave them on for too long. However, because we did these right at the beginning, we were able to use them to aid the rest of the interior work. The extra light at the cost of somewhat higher power use was very helpful for the interior work2. Pictures don’t really convey how bright these are, but it really feels like daylight in there. Because of the high power draw, if I were doing this again I’d select dimmer and more power-conscious light strips.

Since I bought 16 foot strips and used just over 10 feet of each, we had leftover lighting. We decided to put some of these leftovers under the trim above the sink, which I think turned out to be one of the best decisions we made. I had an LED dimmer from a previous set of LED strips (as far as I can tell, it’s just a variable resistor, a 555 timer, and a FET, plus a few passive components) that fits nicely inline, so now he has a lower power dimmable strip for when he doesn’t want full glaring brightness. The dimmer is decent at the high and low ends, but does introduce a noticeable flicker in its midrange. It’s just a male barrel jack at one end and a female at the other, so it can easily be replaced or bypassed down the road3.
| Component | Quantity | Cost Each | Total |
|---|---|---|---|
| 5 meter LED Strips | 2 | $14 | $28 |
| LED Dimmer | 1 | on hand | – |
Outlets
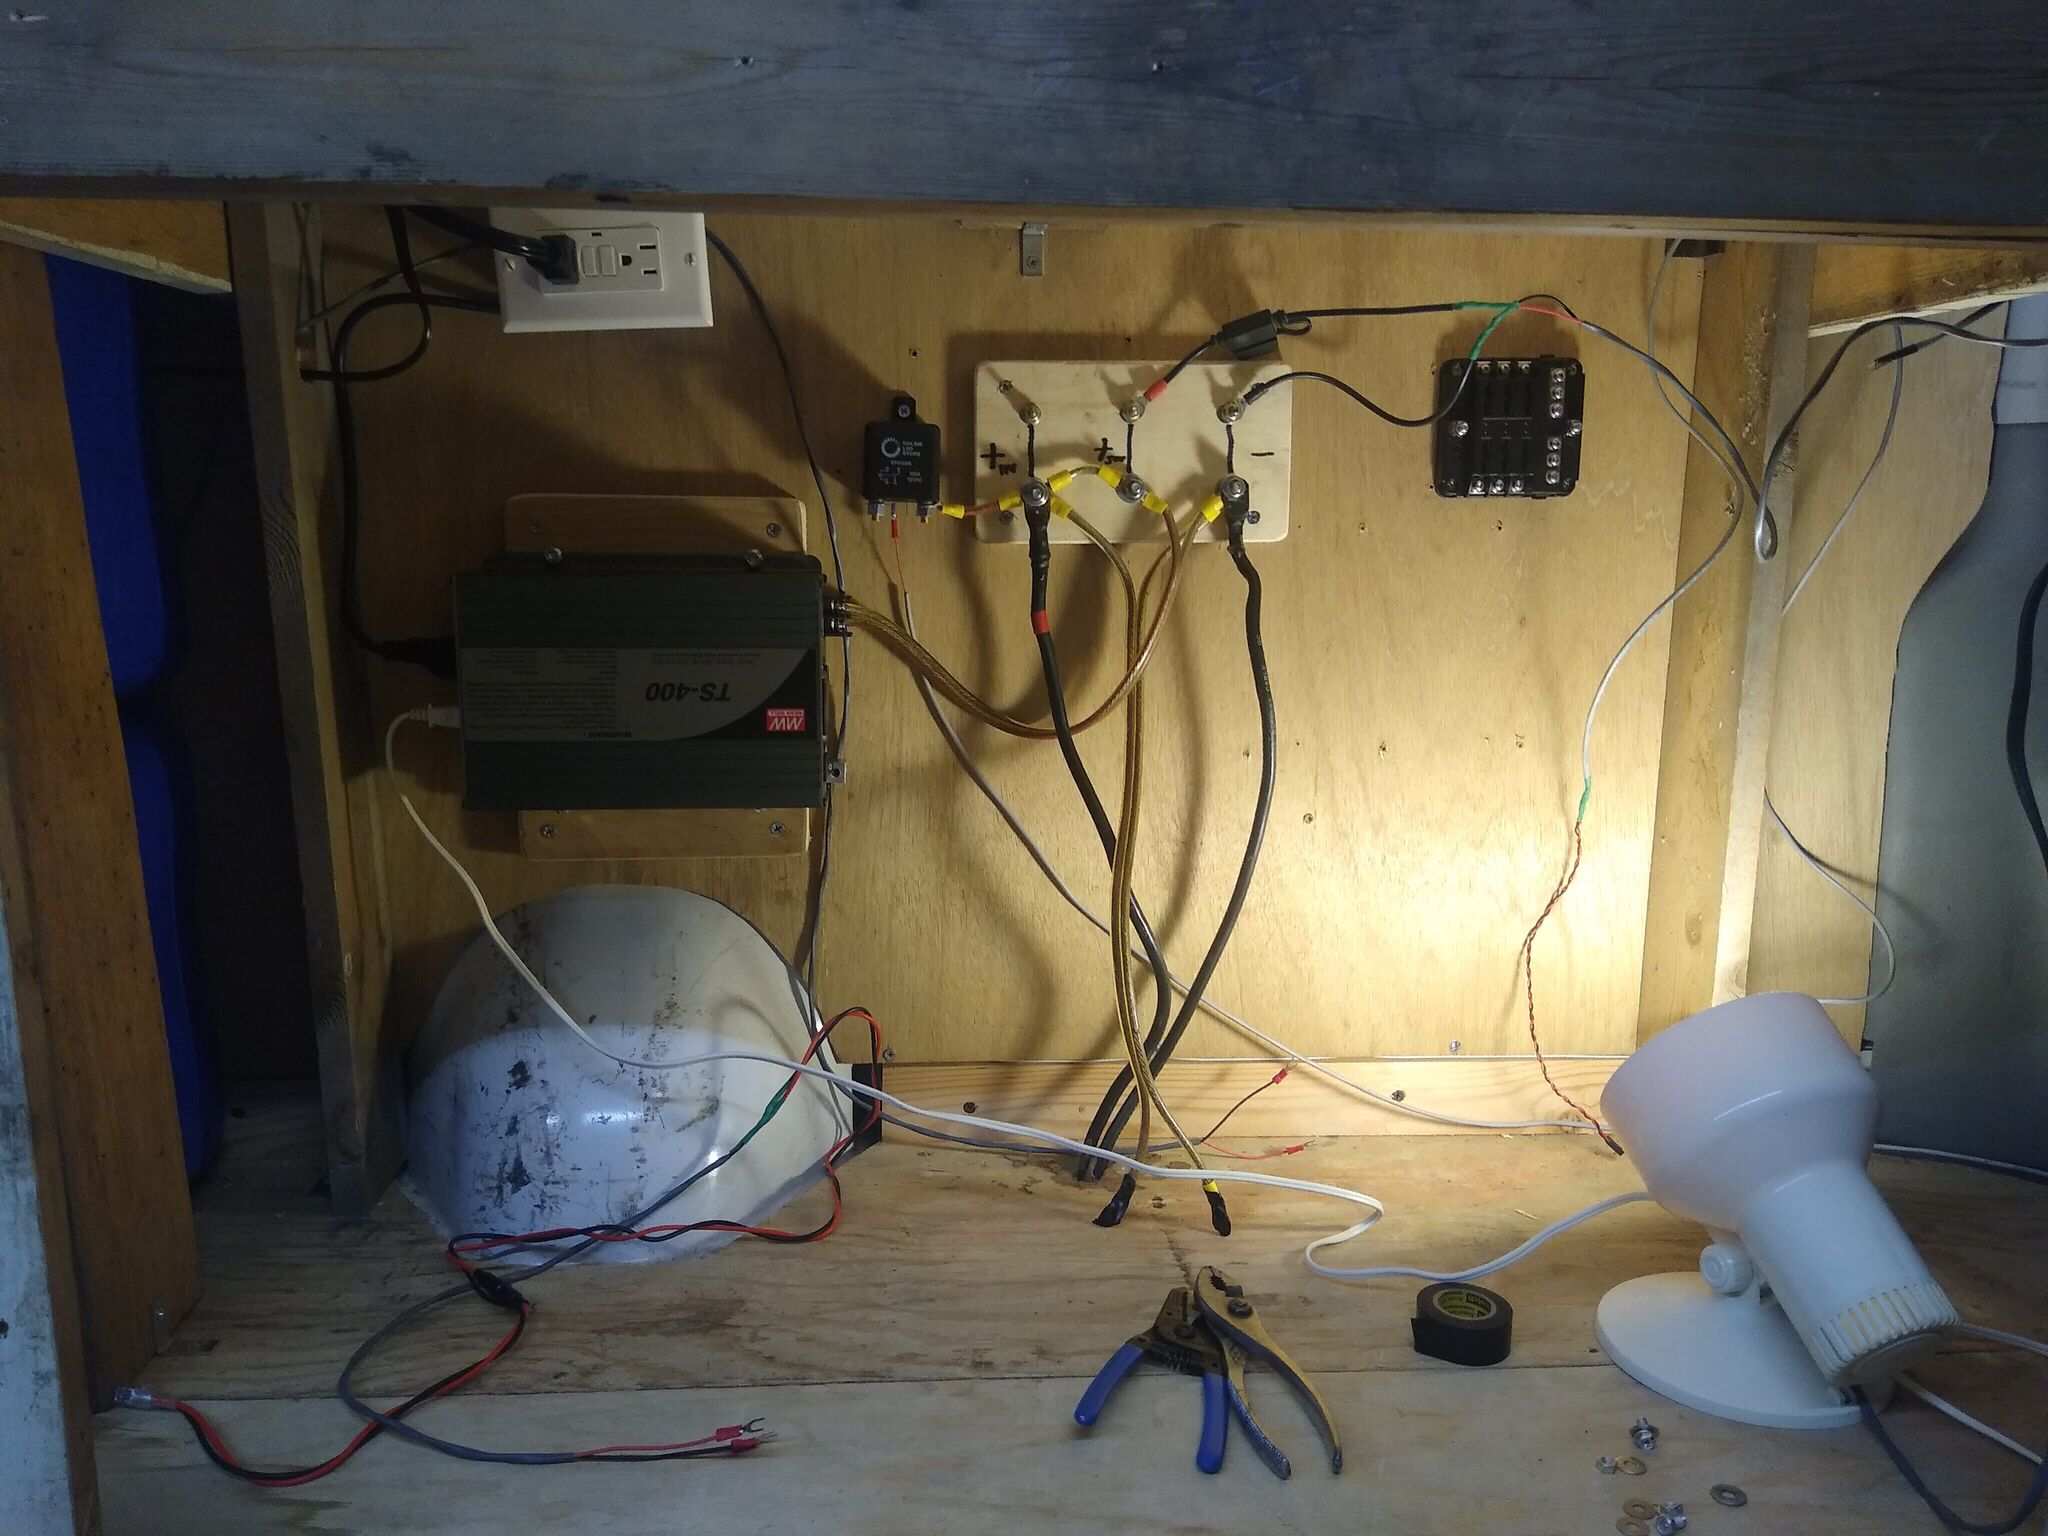
For power, we bought a MEAN WELL 400W inverter. The cheapest inverter that Digikey carried was a 200W MEAN WELL model for $131, but if the 400W model is only $6 more, it seems to be worth the upgrade for the flexibility—now he can make waffles! The idle drain doesn’t seem to be any different (both draw 15W); in fact, the models seem nearly identical, except that the 400W model has a fan, where the 200W model is passively cooled.
This feeds two outlet boxes, one near the back door and one right behind the driver’s seat. A six foot cord will reach an outlet from anywhere in the vehicle. The outlets are closer to extension cords, really—sealed units that just needed a hole cut, and with a standard plug to connect to the inverter. They also have a stepdown transformer to deliver 5V power over two USB ports. These don’t really make sense for Isaac’s van, but it was surprisingly difficult to find outlets without USB ports!
It may have not been strictly necessary, since the concept of “ground” in a vehicle is pretty relative (and we didn’t end up grounding the inverter), but because the outlets are definitely within six feet of a water source we also added GFCI protection. I just grabbed a GFCI outlet and box, connected a plug to the wire coming into the box, and inserted the new box in between the outlets and the inverter (visible at the top left of the picture below).
Here’s the basic setup for testing the inverter. We’re missing many of the other components; this is drawing straight from the vehicle’s battery, bypassing any switches or controls. Here, the inverter is powering the lamp on the right side of the image. The rear outlets are powered; the front outlets hadn’t been installed when this picture was taken, and eventually filled the second outlet on the GFCI box.
In addition to the 120V outlets, we added two 12V standard car outlets4. These don’t draw an 15W day in and day out, so Isaac can leave his electronics charging overnight without having to worry about excessive power consumption and noise. As with the 120V outlets, there’s one in the front and one in the back.
| Component | Quantity | Cost Each | Total |
|---|---|---|---|
| Meanwell TS-400 Inverter | 1 | $155 shipped | $155 |
| 12V outlets (2pk) | 1 | $11 | $11 |
| GFCI outlet | 1 | $10 | $10 |
| 120V outlets | 2 | $13 | $26 |
Power Distribution
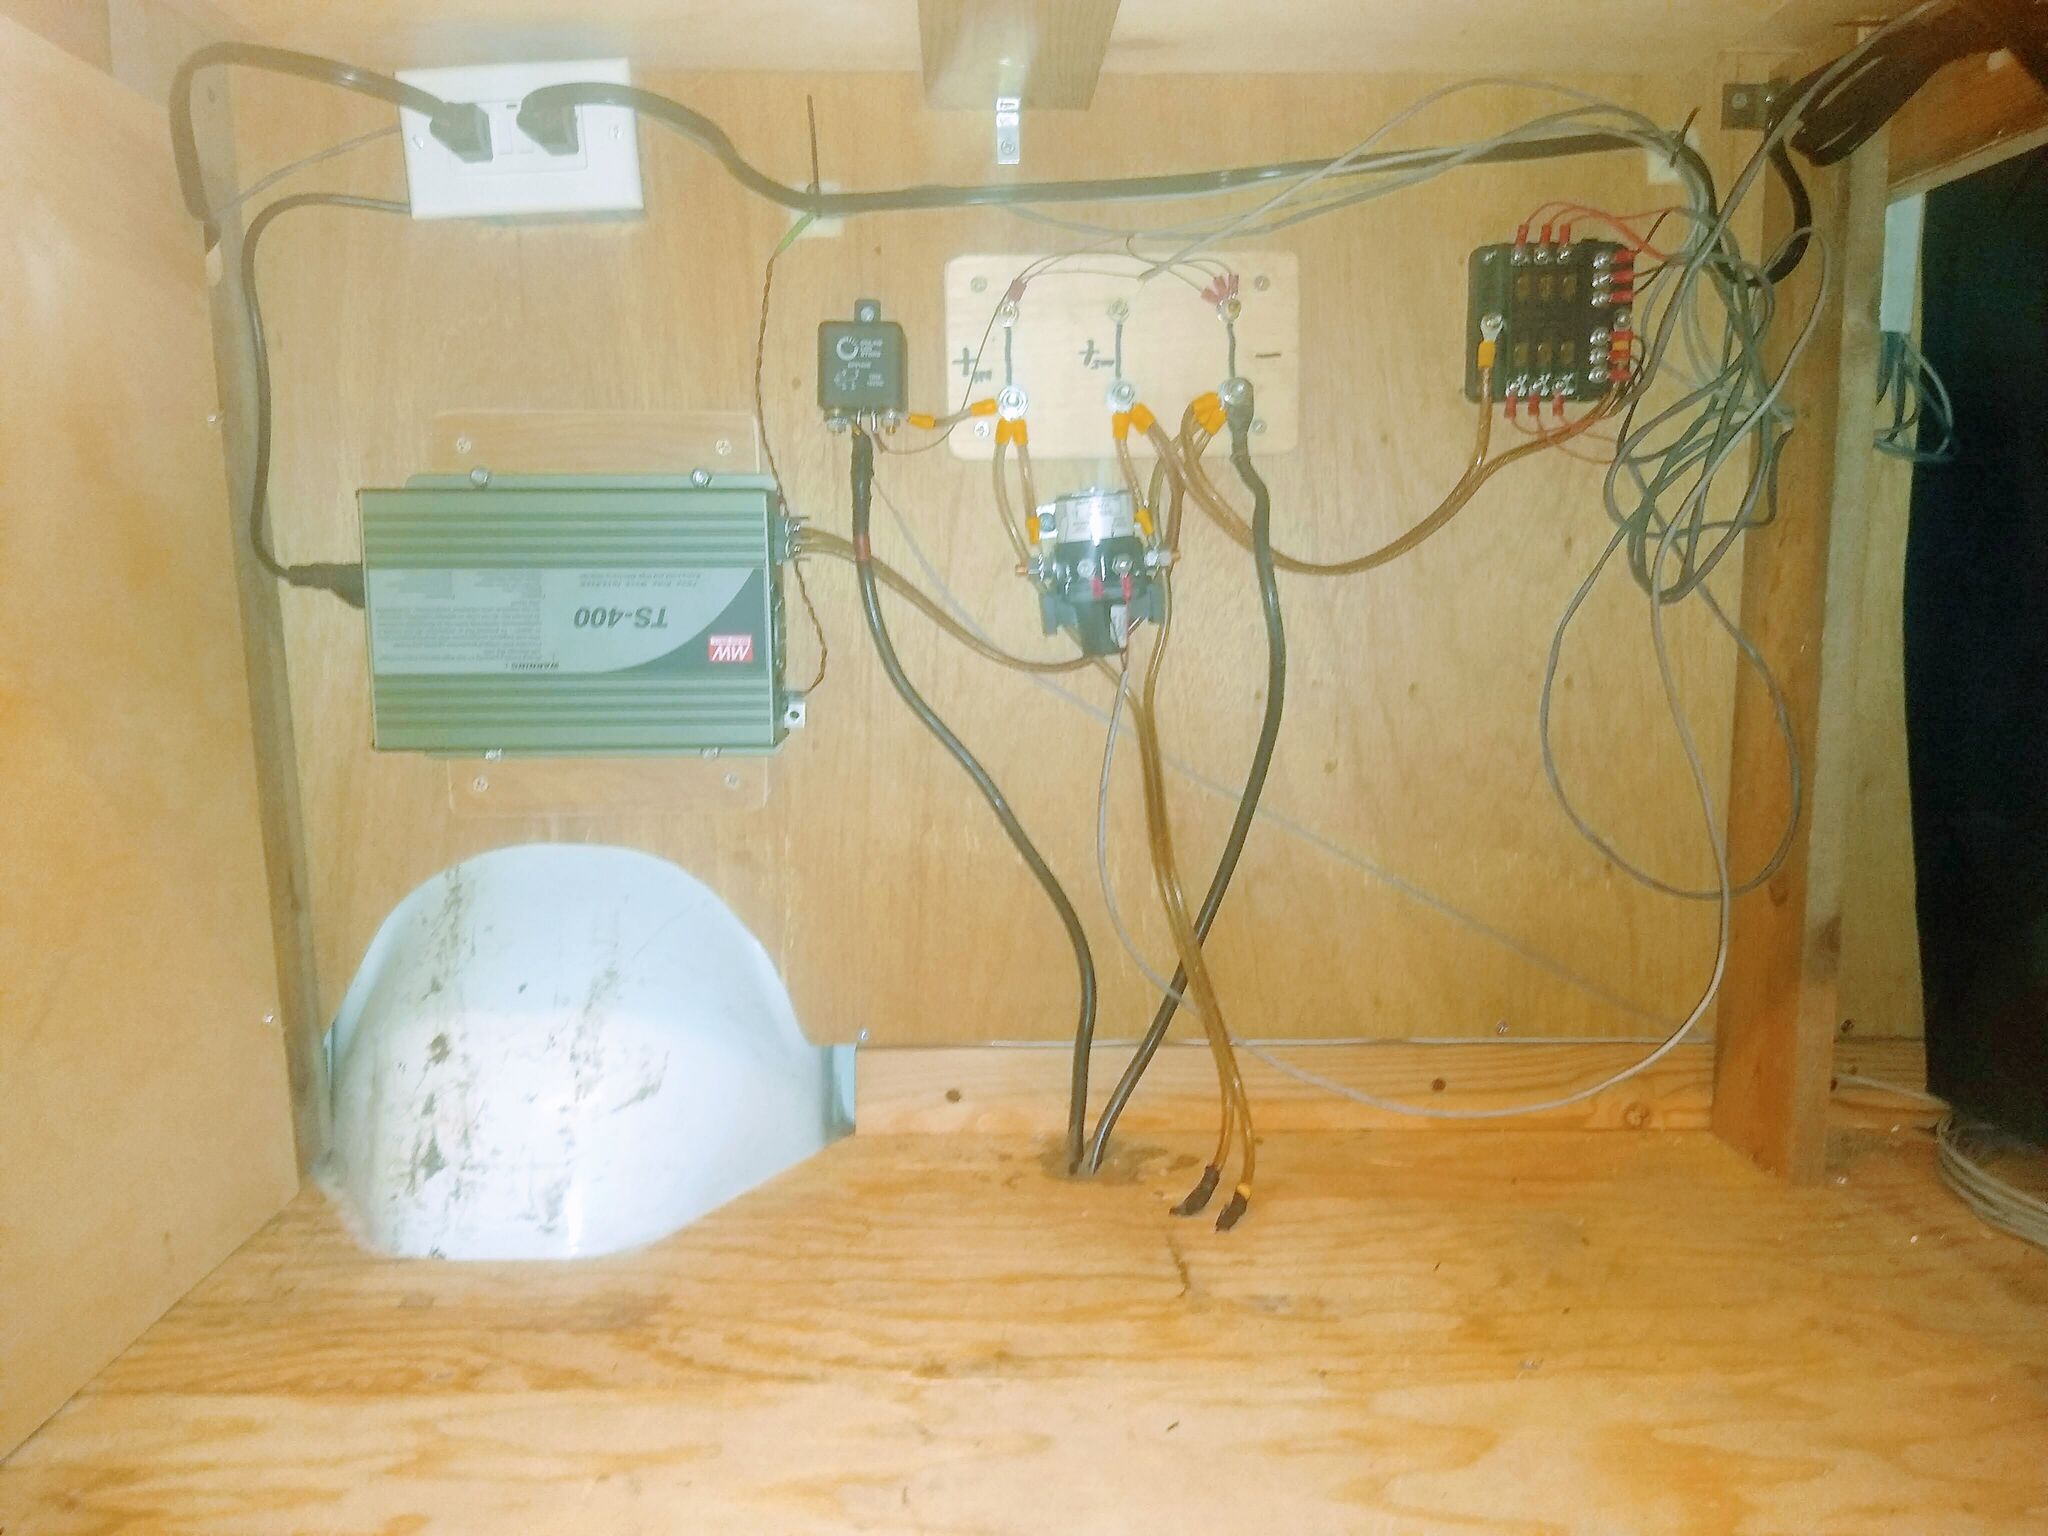
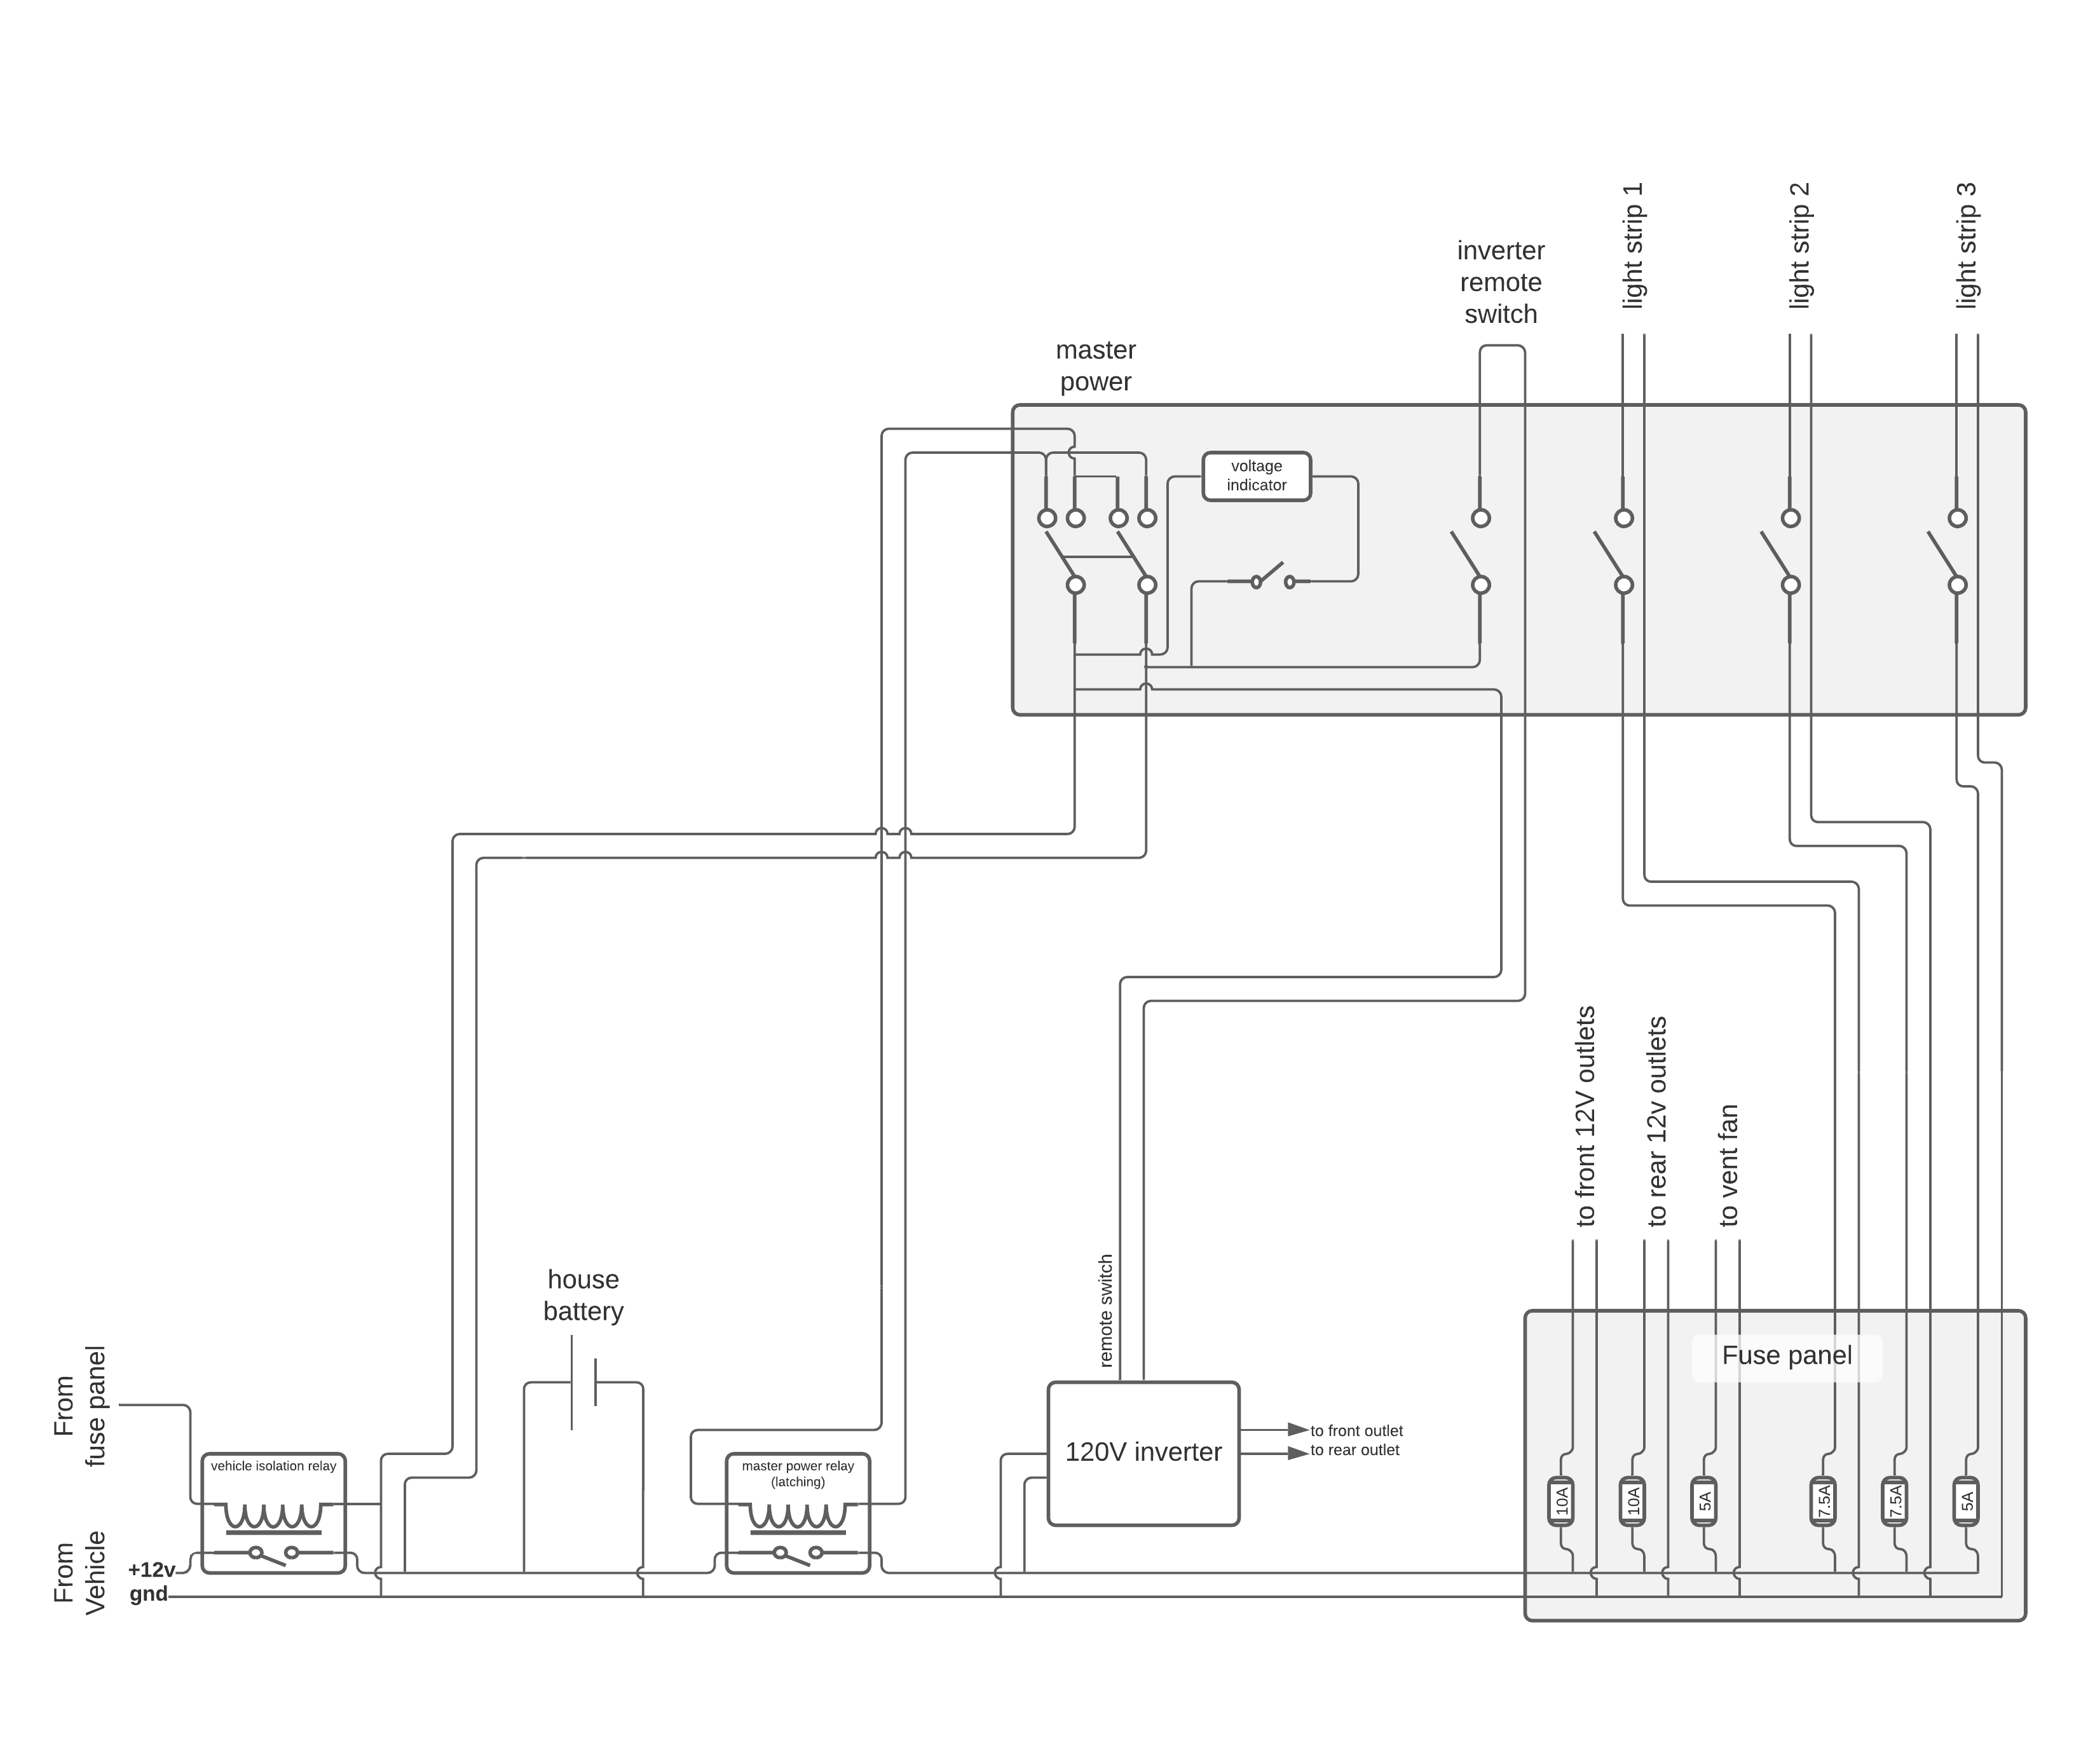
Thankfully, one of the things I was least looking forward to doing was already done: The previous owners (the Minneapolis Parks Department, perhaps?) had needed power in the back of the van, so they had run 4 gauge 12V lines directly off the battery, fused at 150A, and did a very clean job of it. The cables popped up through the floor a few feet behind the driver’s seat, so this was the area I had available to use.
The goal is to use the alternator to charge the battery while the vehicle is running, but then to not drain the engine’s battery while the vehicle is off. To do this, I used a 120A relay triggered off a fuse panel tap. Skimming through the fuses in the panel, the windshield wipers are powered when the vehicle’s engine is running, and off when the engine is off. Additionally, they don’t run when the engine is cranking, so the house battery will be disconnected then too. (If we didn’t, we might end up drawing more than the rated current for the deep cycle battery, which may shorten its life.) The interior fuse panel is to the left of the steering column, so I just ran a single wire back behind the driver’s seat, fused at 2.5A, to power the relay.
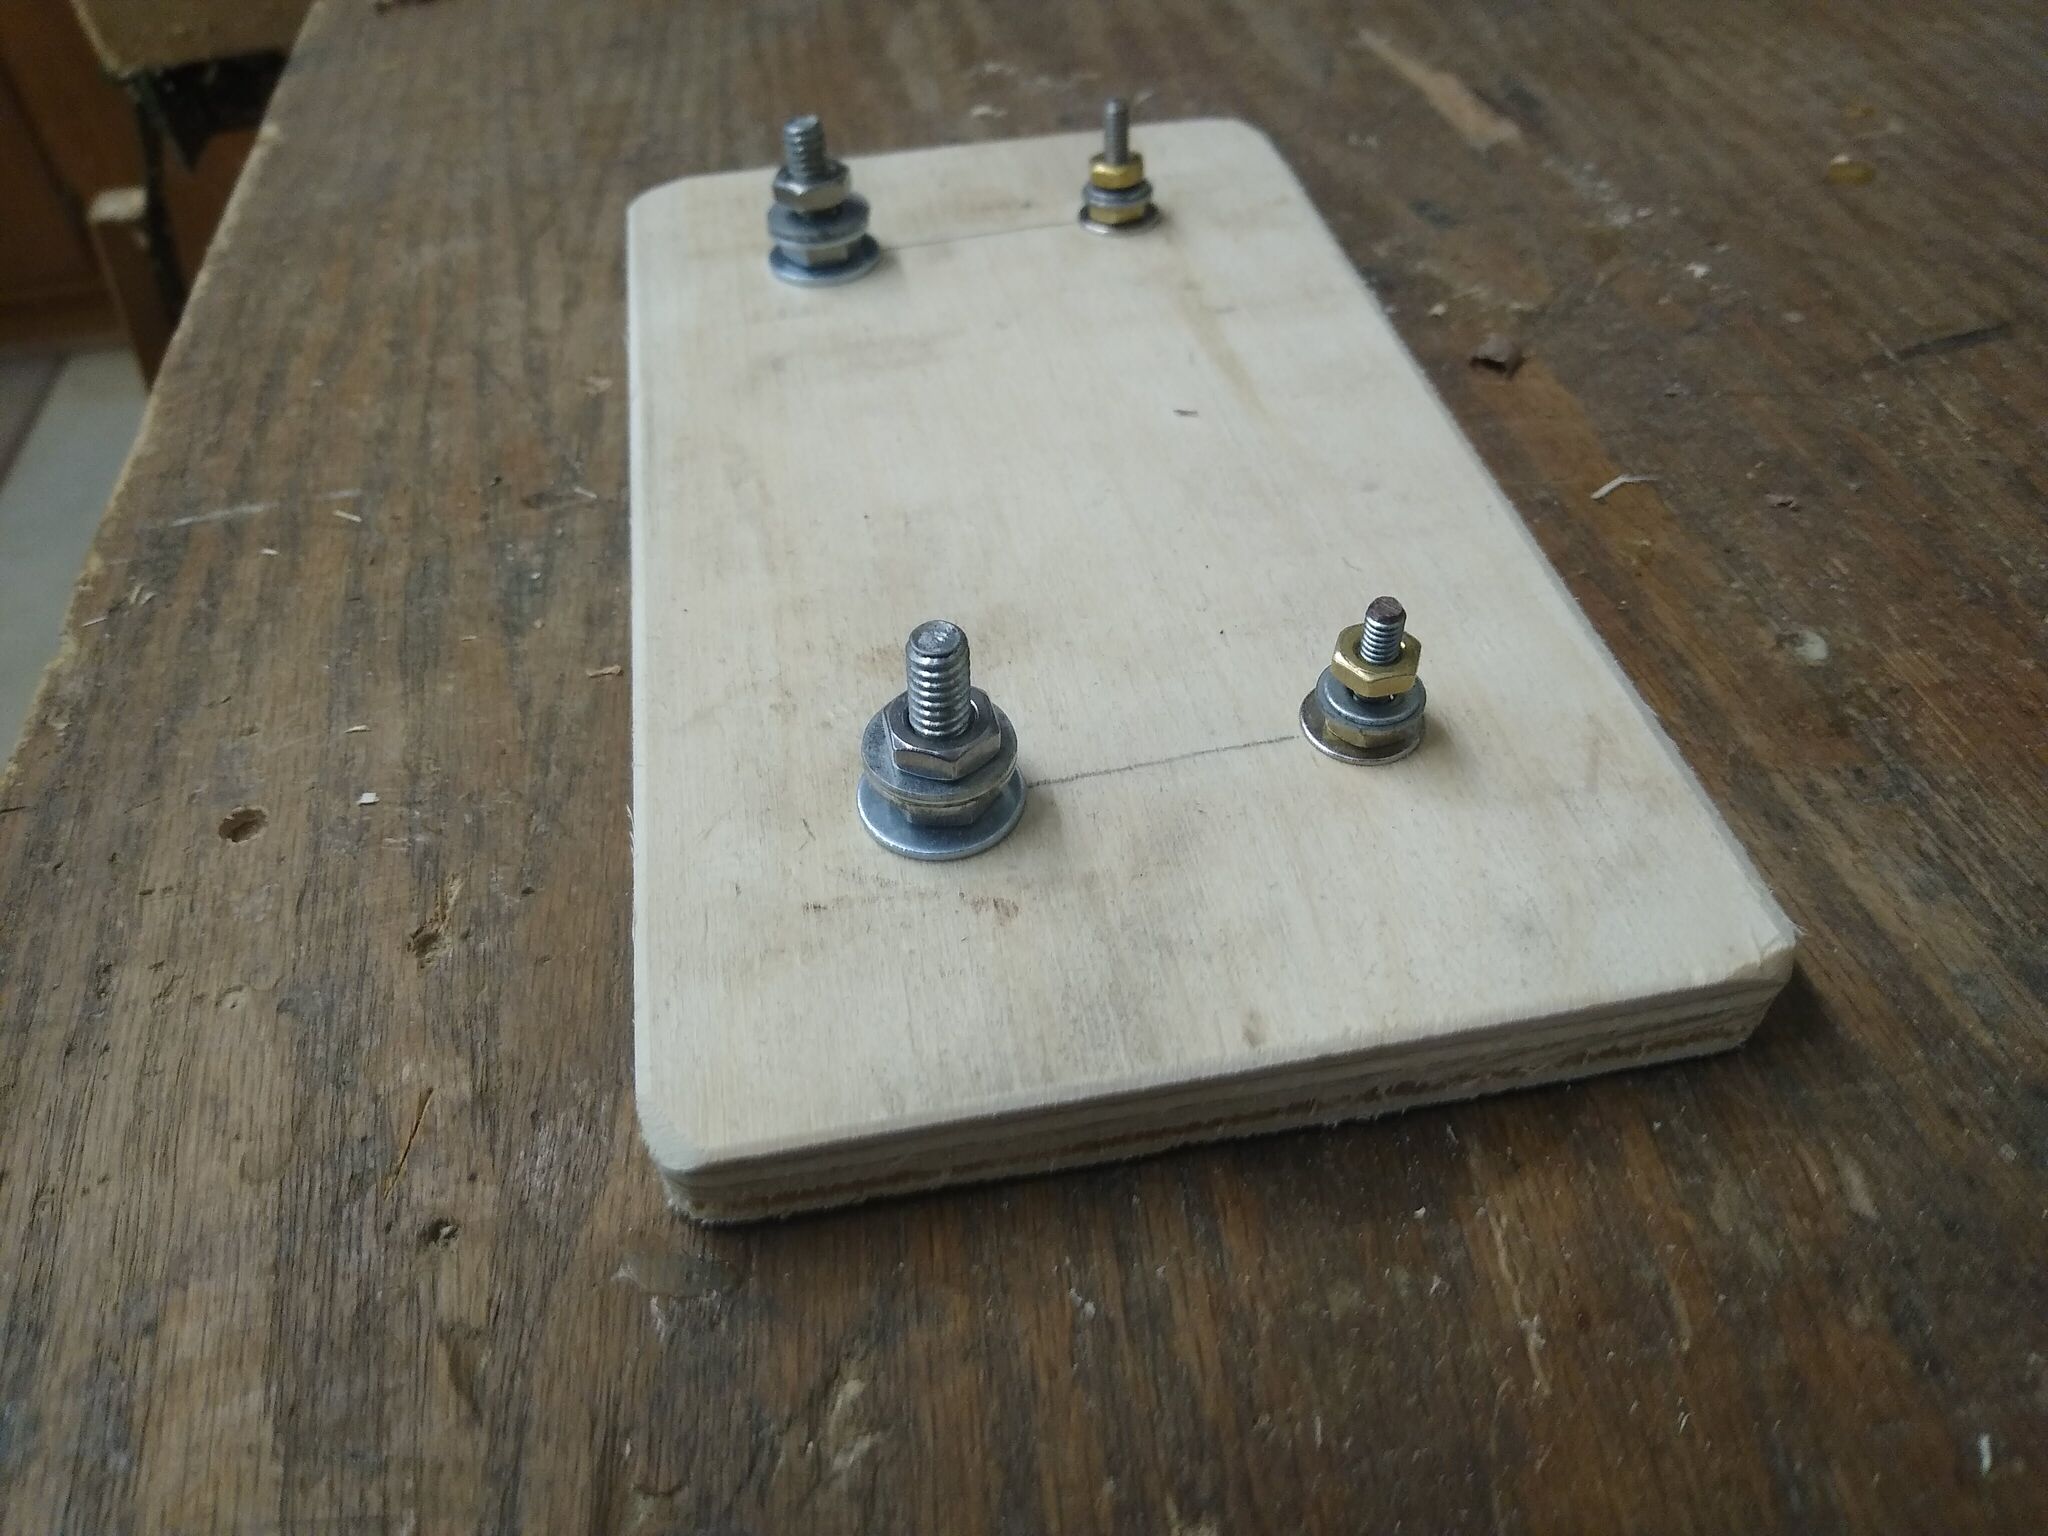
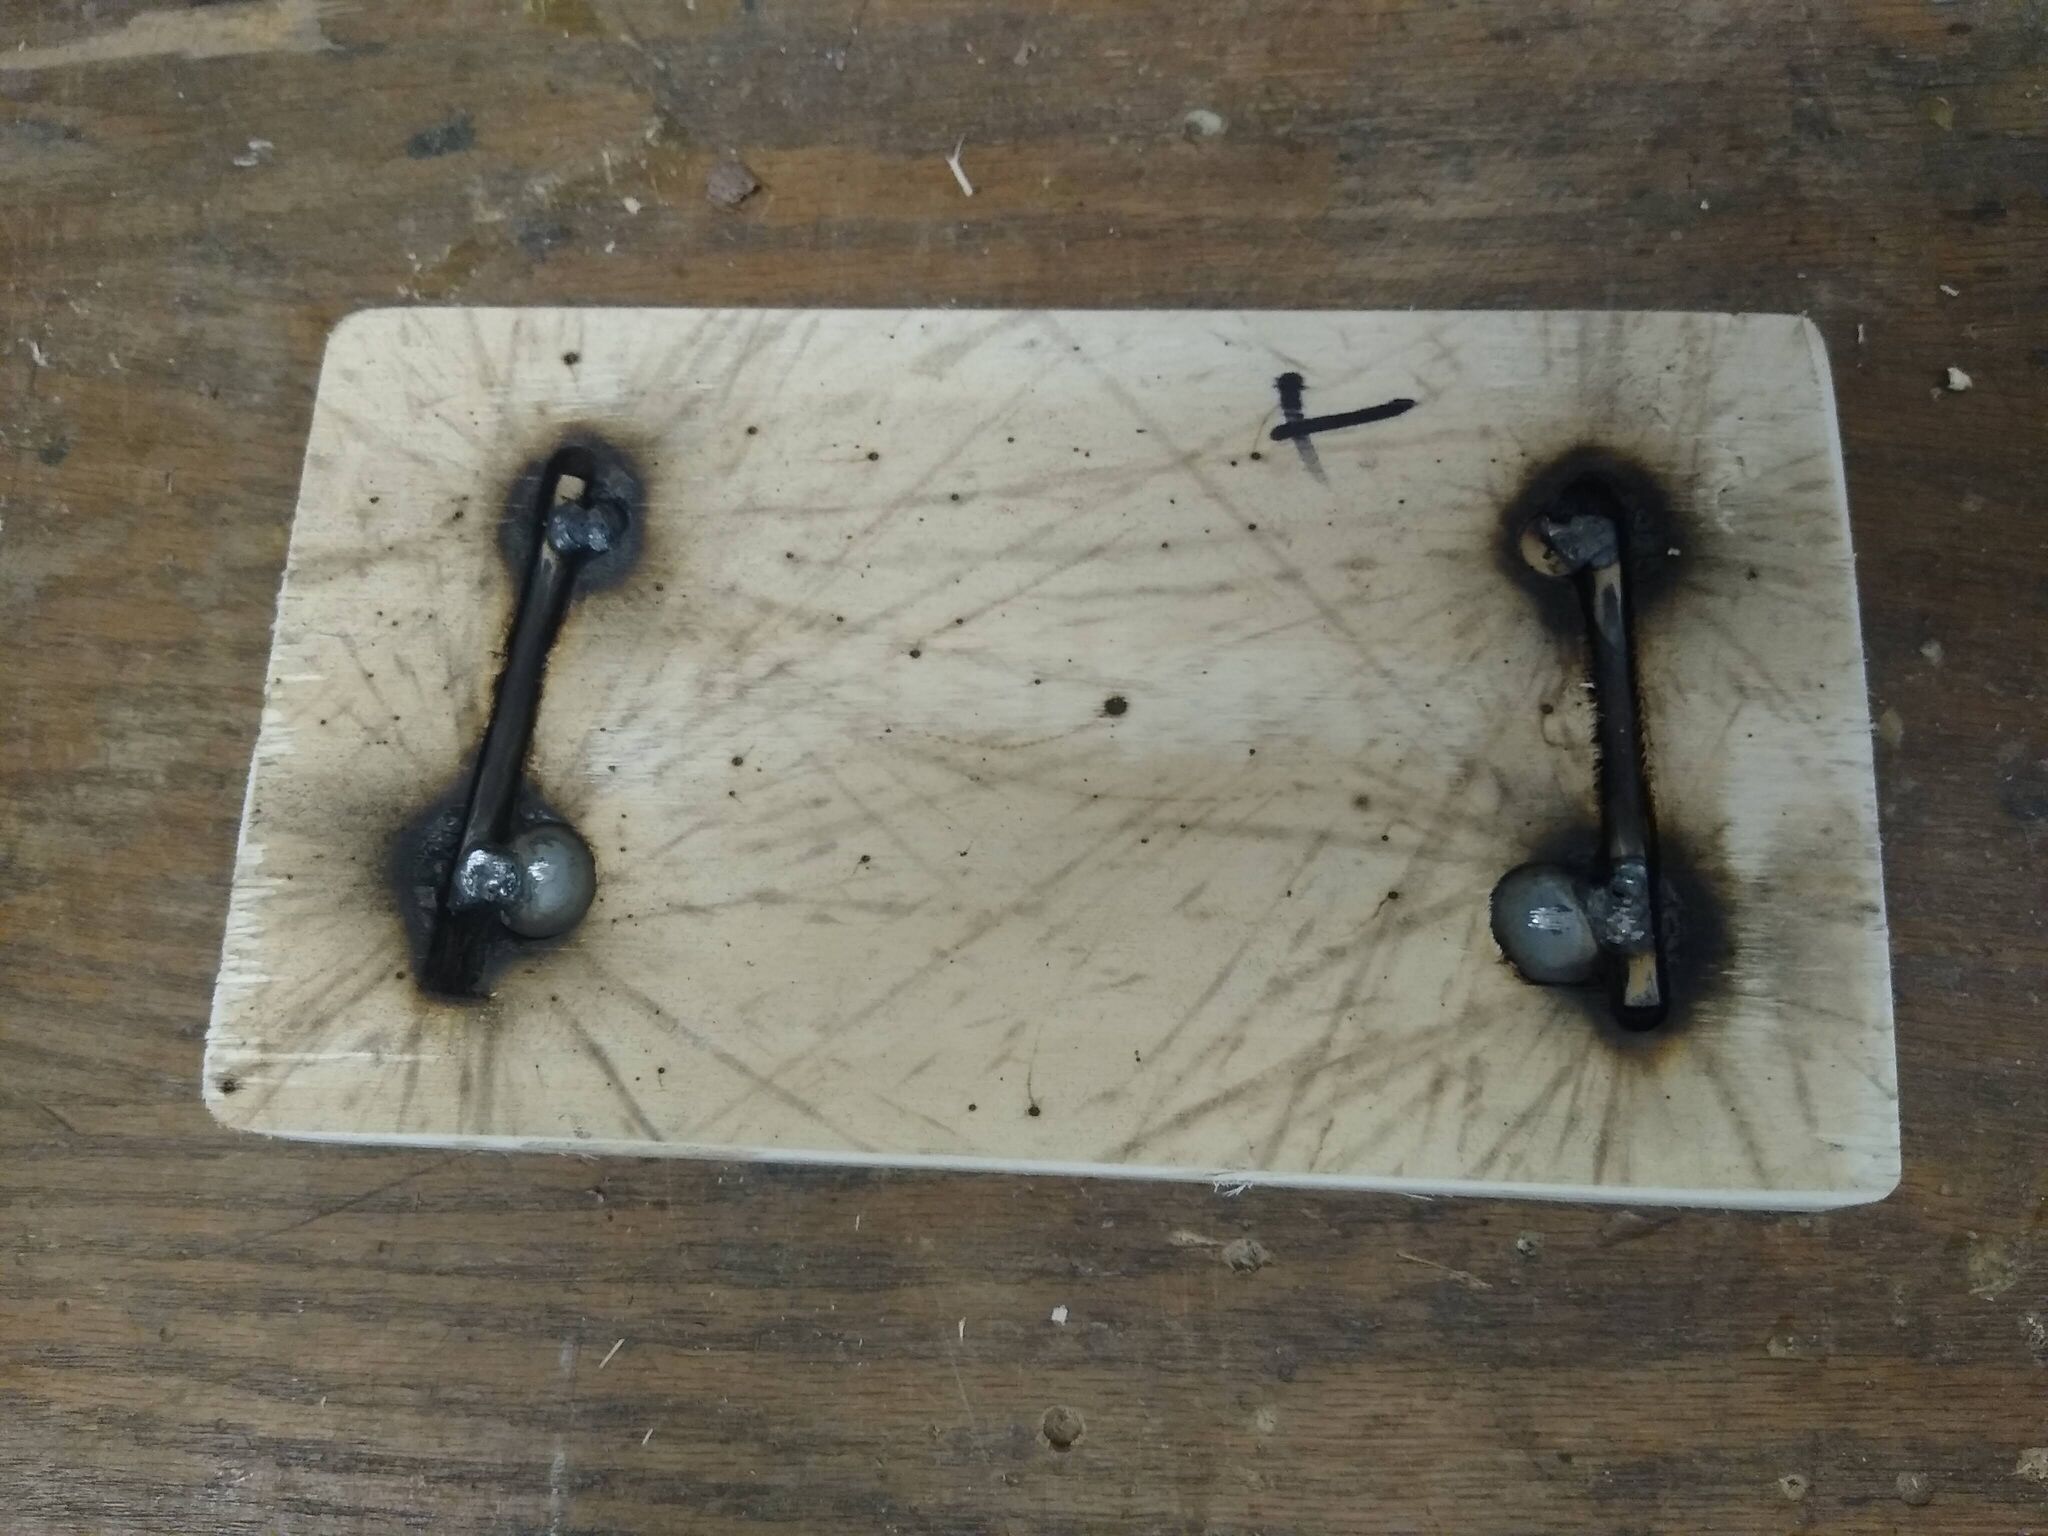
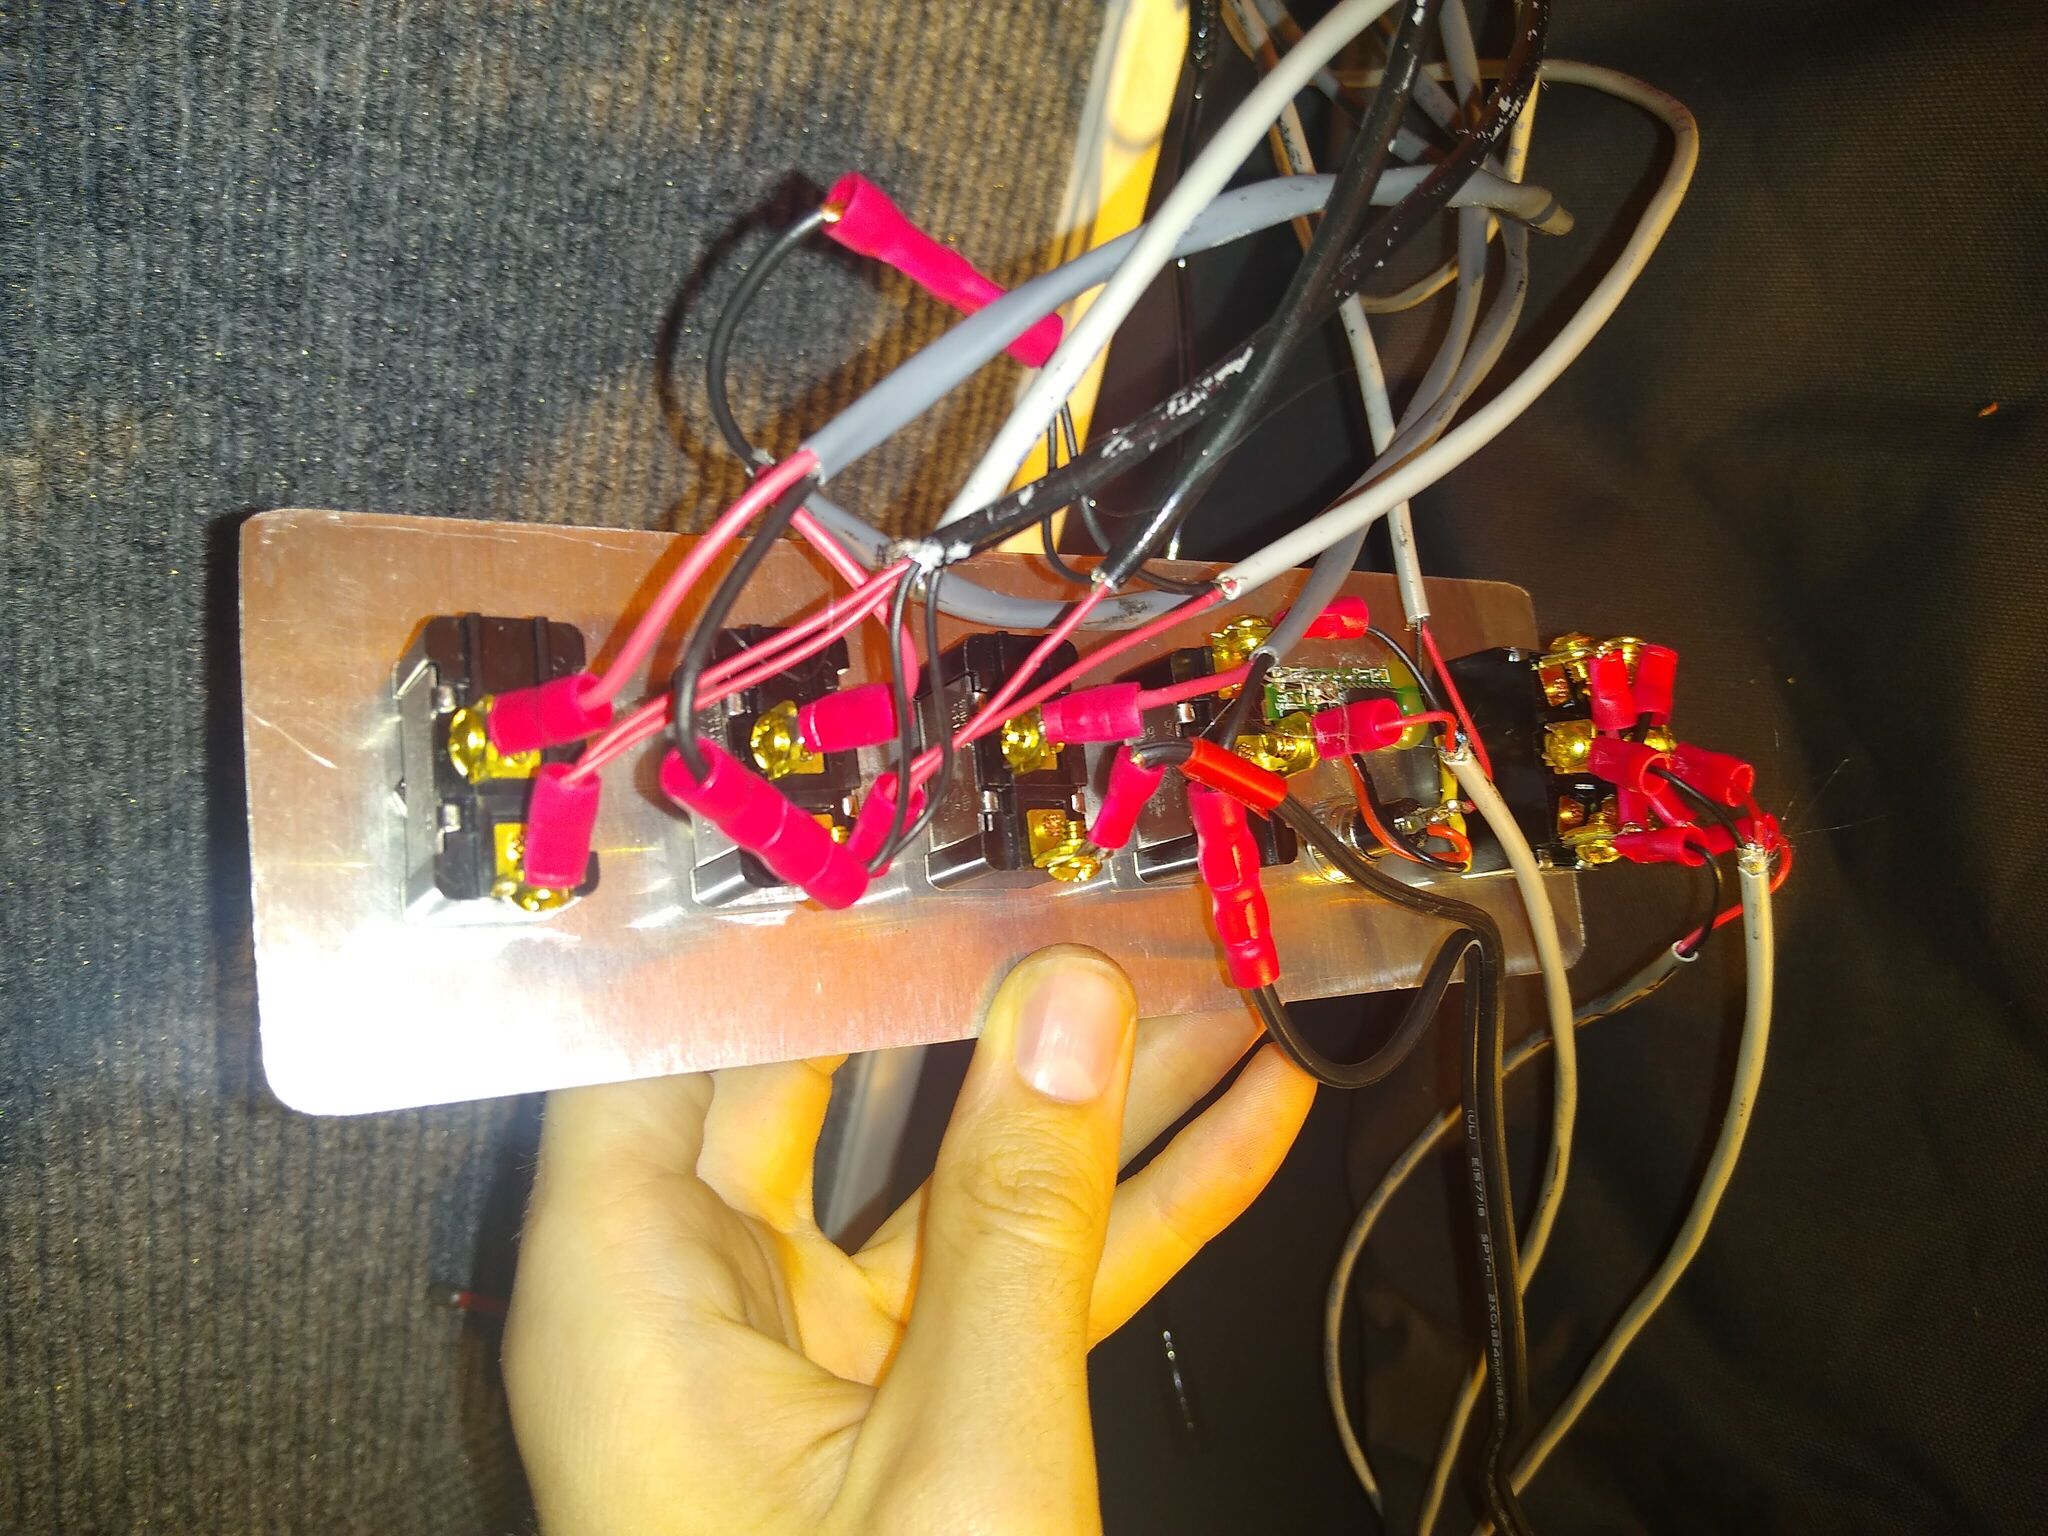
The large black wires from the engine pop up through the floor, run through the charging relay, and go to a distribution panel we custom built. There are small and large posts for each of 12V always-powered, 12v switched, and neutral. They’re electrically connected in the back. (It’s just four bolts cut short, the appropriate nuts and washers, and a chunk of coathanger wire (chosen for its stiffness) wirefeed welded in between. Here’s an earlier iteration from before we decided to add an extra set of posts for 12v switched:
Between 12V always-powered and 12V switched sits our latching relay. Unlike the charging relay, where we can afford to have a few watts’ drain since the engine is running, we don’t want this part of the circuit to have any idle drain. RVs tend to use latching relays for this purpose, and so did we. It only needs power for a second to turn on and a second to turn off, and is otherwise unpowered. This is the shiny cylinder below the primary power distribution panel. With this off, nothing but the voltage indicator is powered.
The switched bus feeds the inverter, as discussed earlier, as well as the fuse panel. The 6-way fuse panel (which uses standard mini fuses, the same as what the vehicle uses) provides power to three sets of lights (fused at 7.5A), two 12V outlets (fused at 5A), and the fan (fused at 5A, draws <2A).
The dangling gold wires will be connected to the house battery, which was neither purchased nor installed at the time of this picture.
| Component | Quantity | Cost Each | Total |
|---|---|---|---|
| Latching relay | 1 | $49 | $49 |
| Fuse block | 1 | $14 | $28 |
| 120A charging relay | 1 | $12 | $12 |
| Fuse tap | 1 | $6 | $6 |
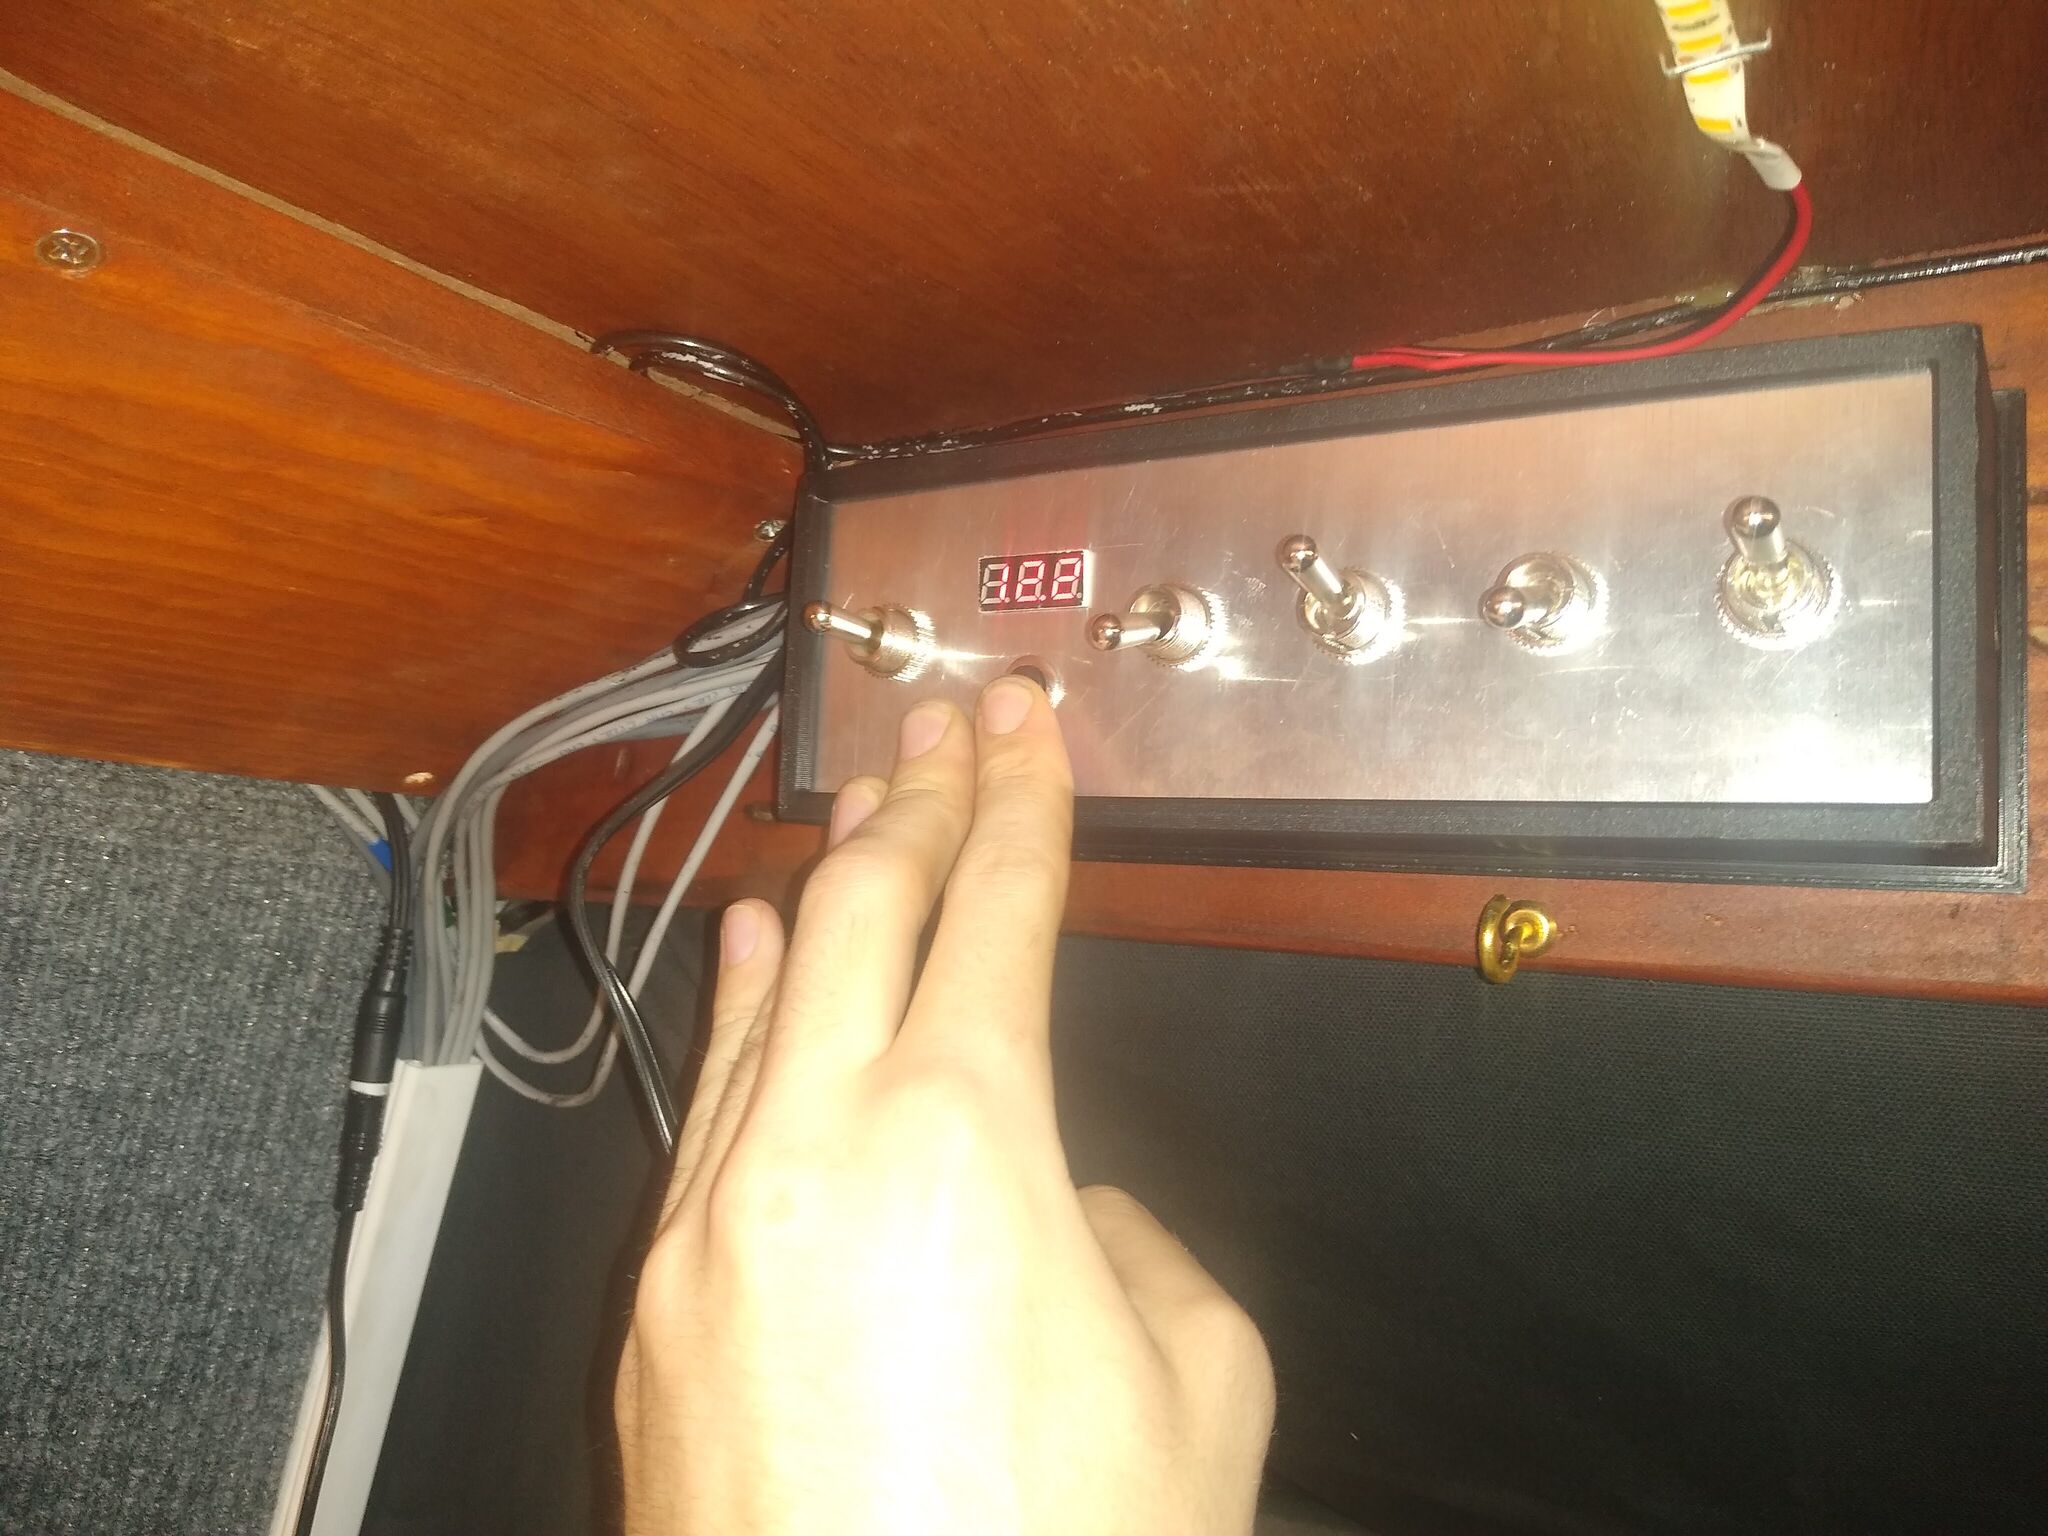
Control panel
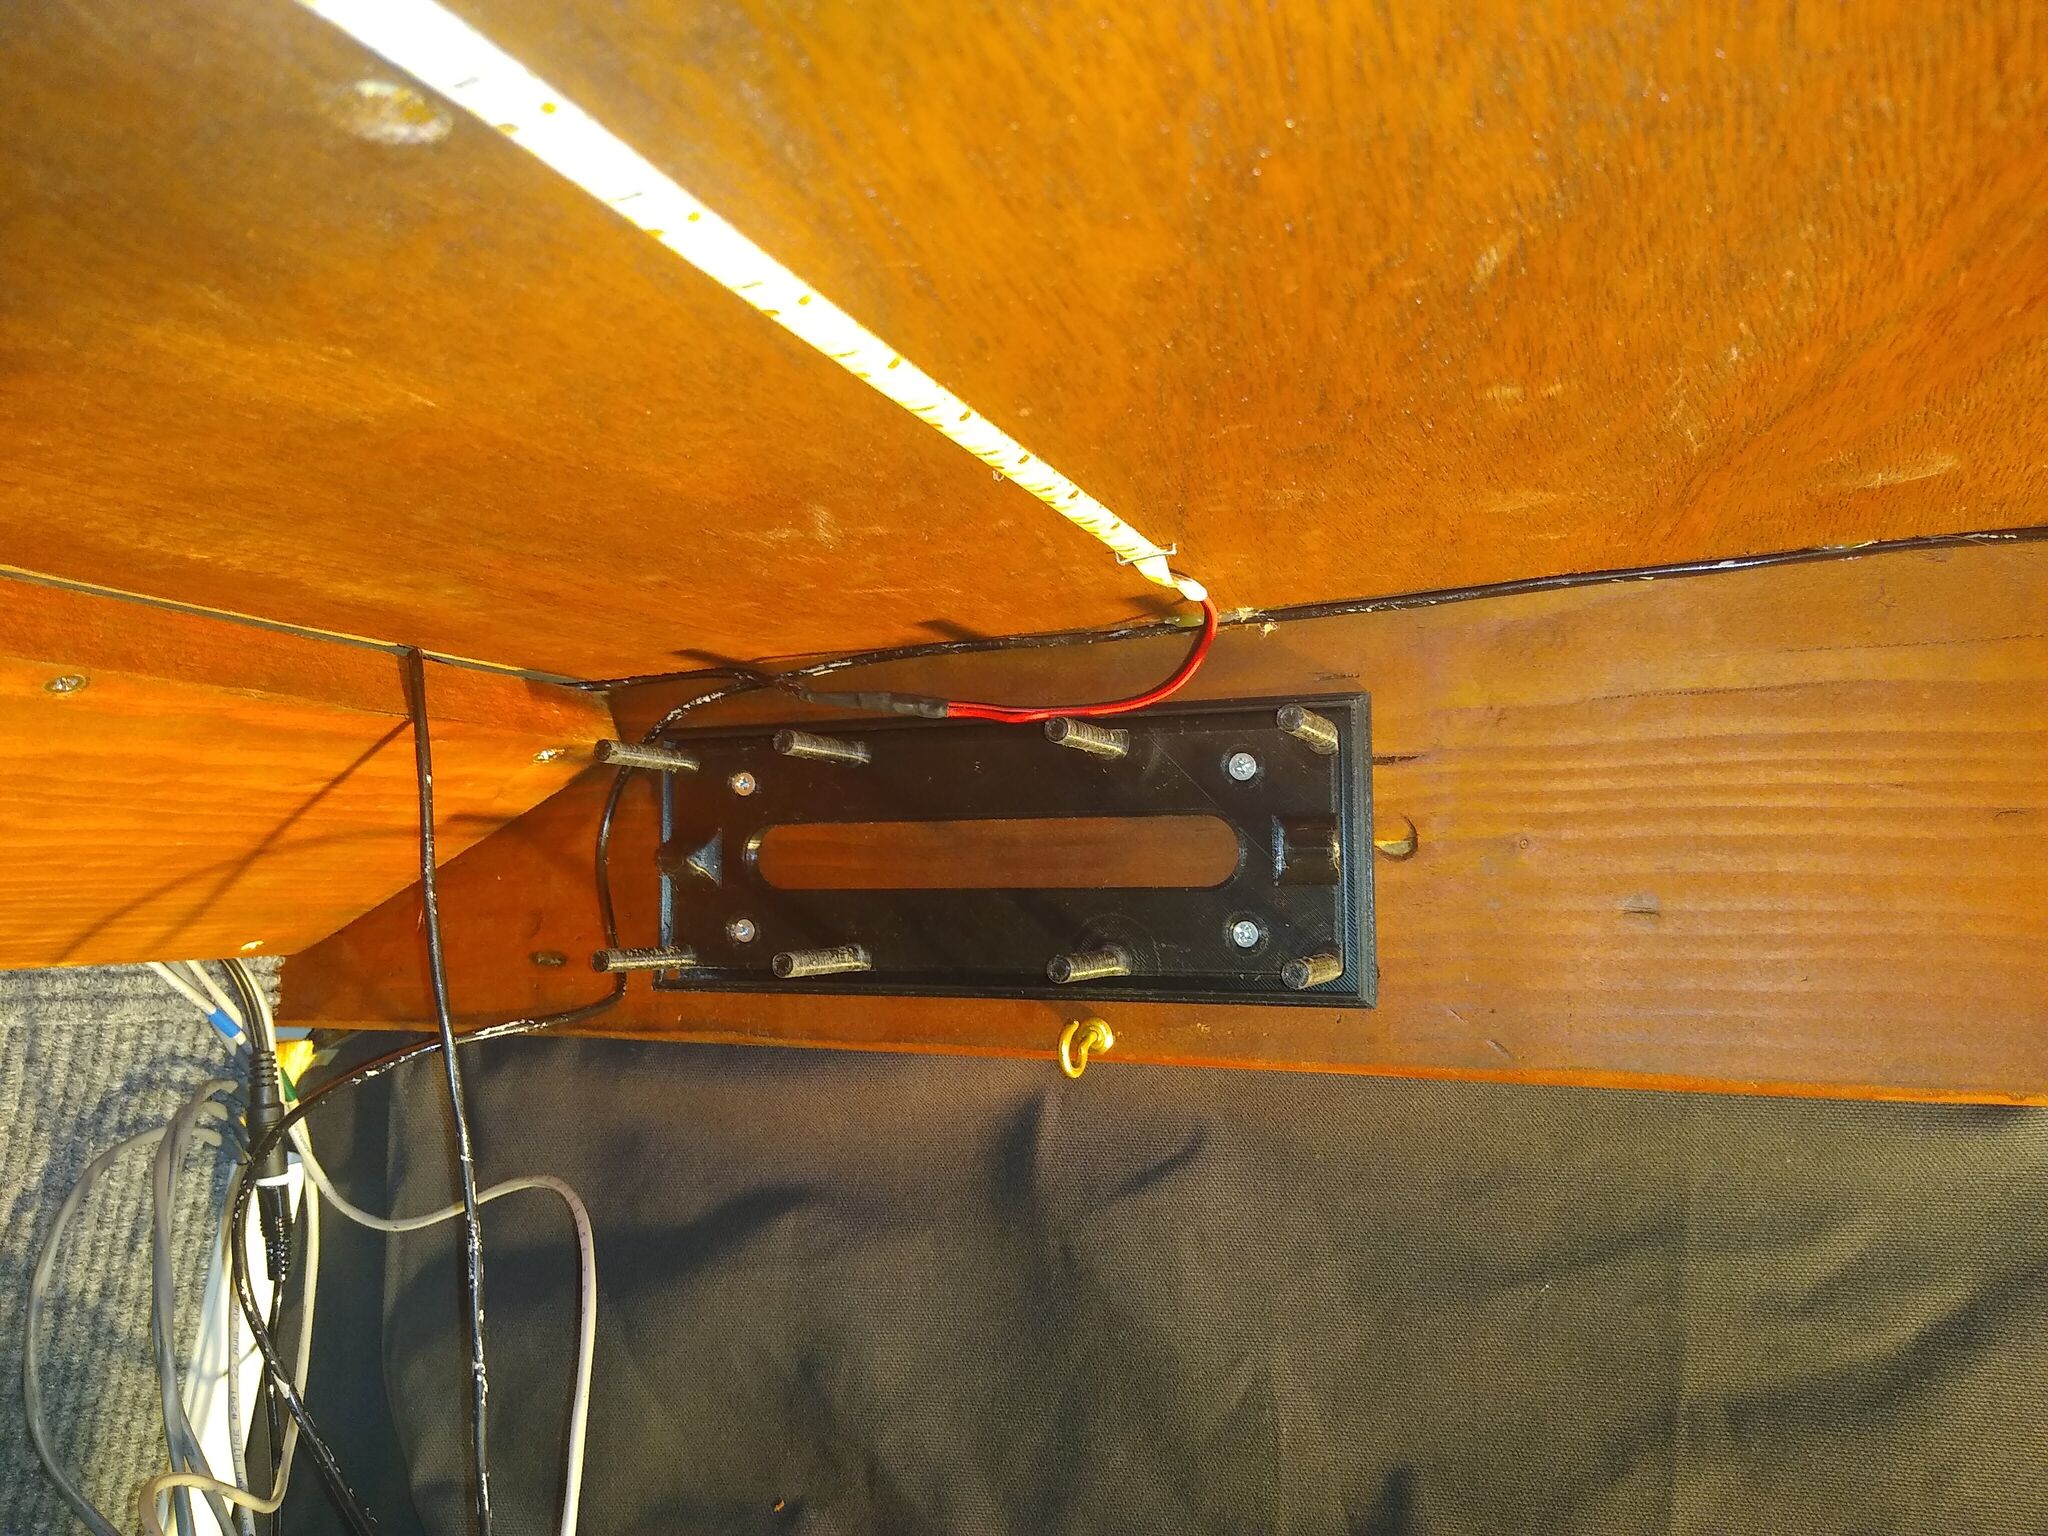
We needed a compact way to control all this, so Dad offered to design a 3D printable case that would contain the switches for lights, the inverter, and main power. We wound up with a design that I really like. It’s a two part design: The base mounts to the wall, an aluminum faceplace with the switches is placed up against it, and the housing slides in, sandwiching the faceplate in place.
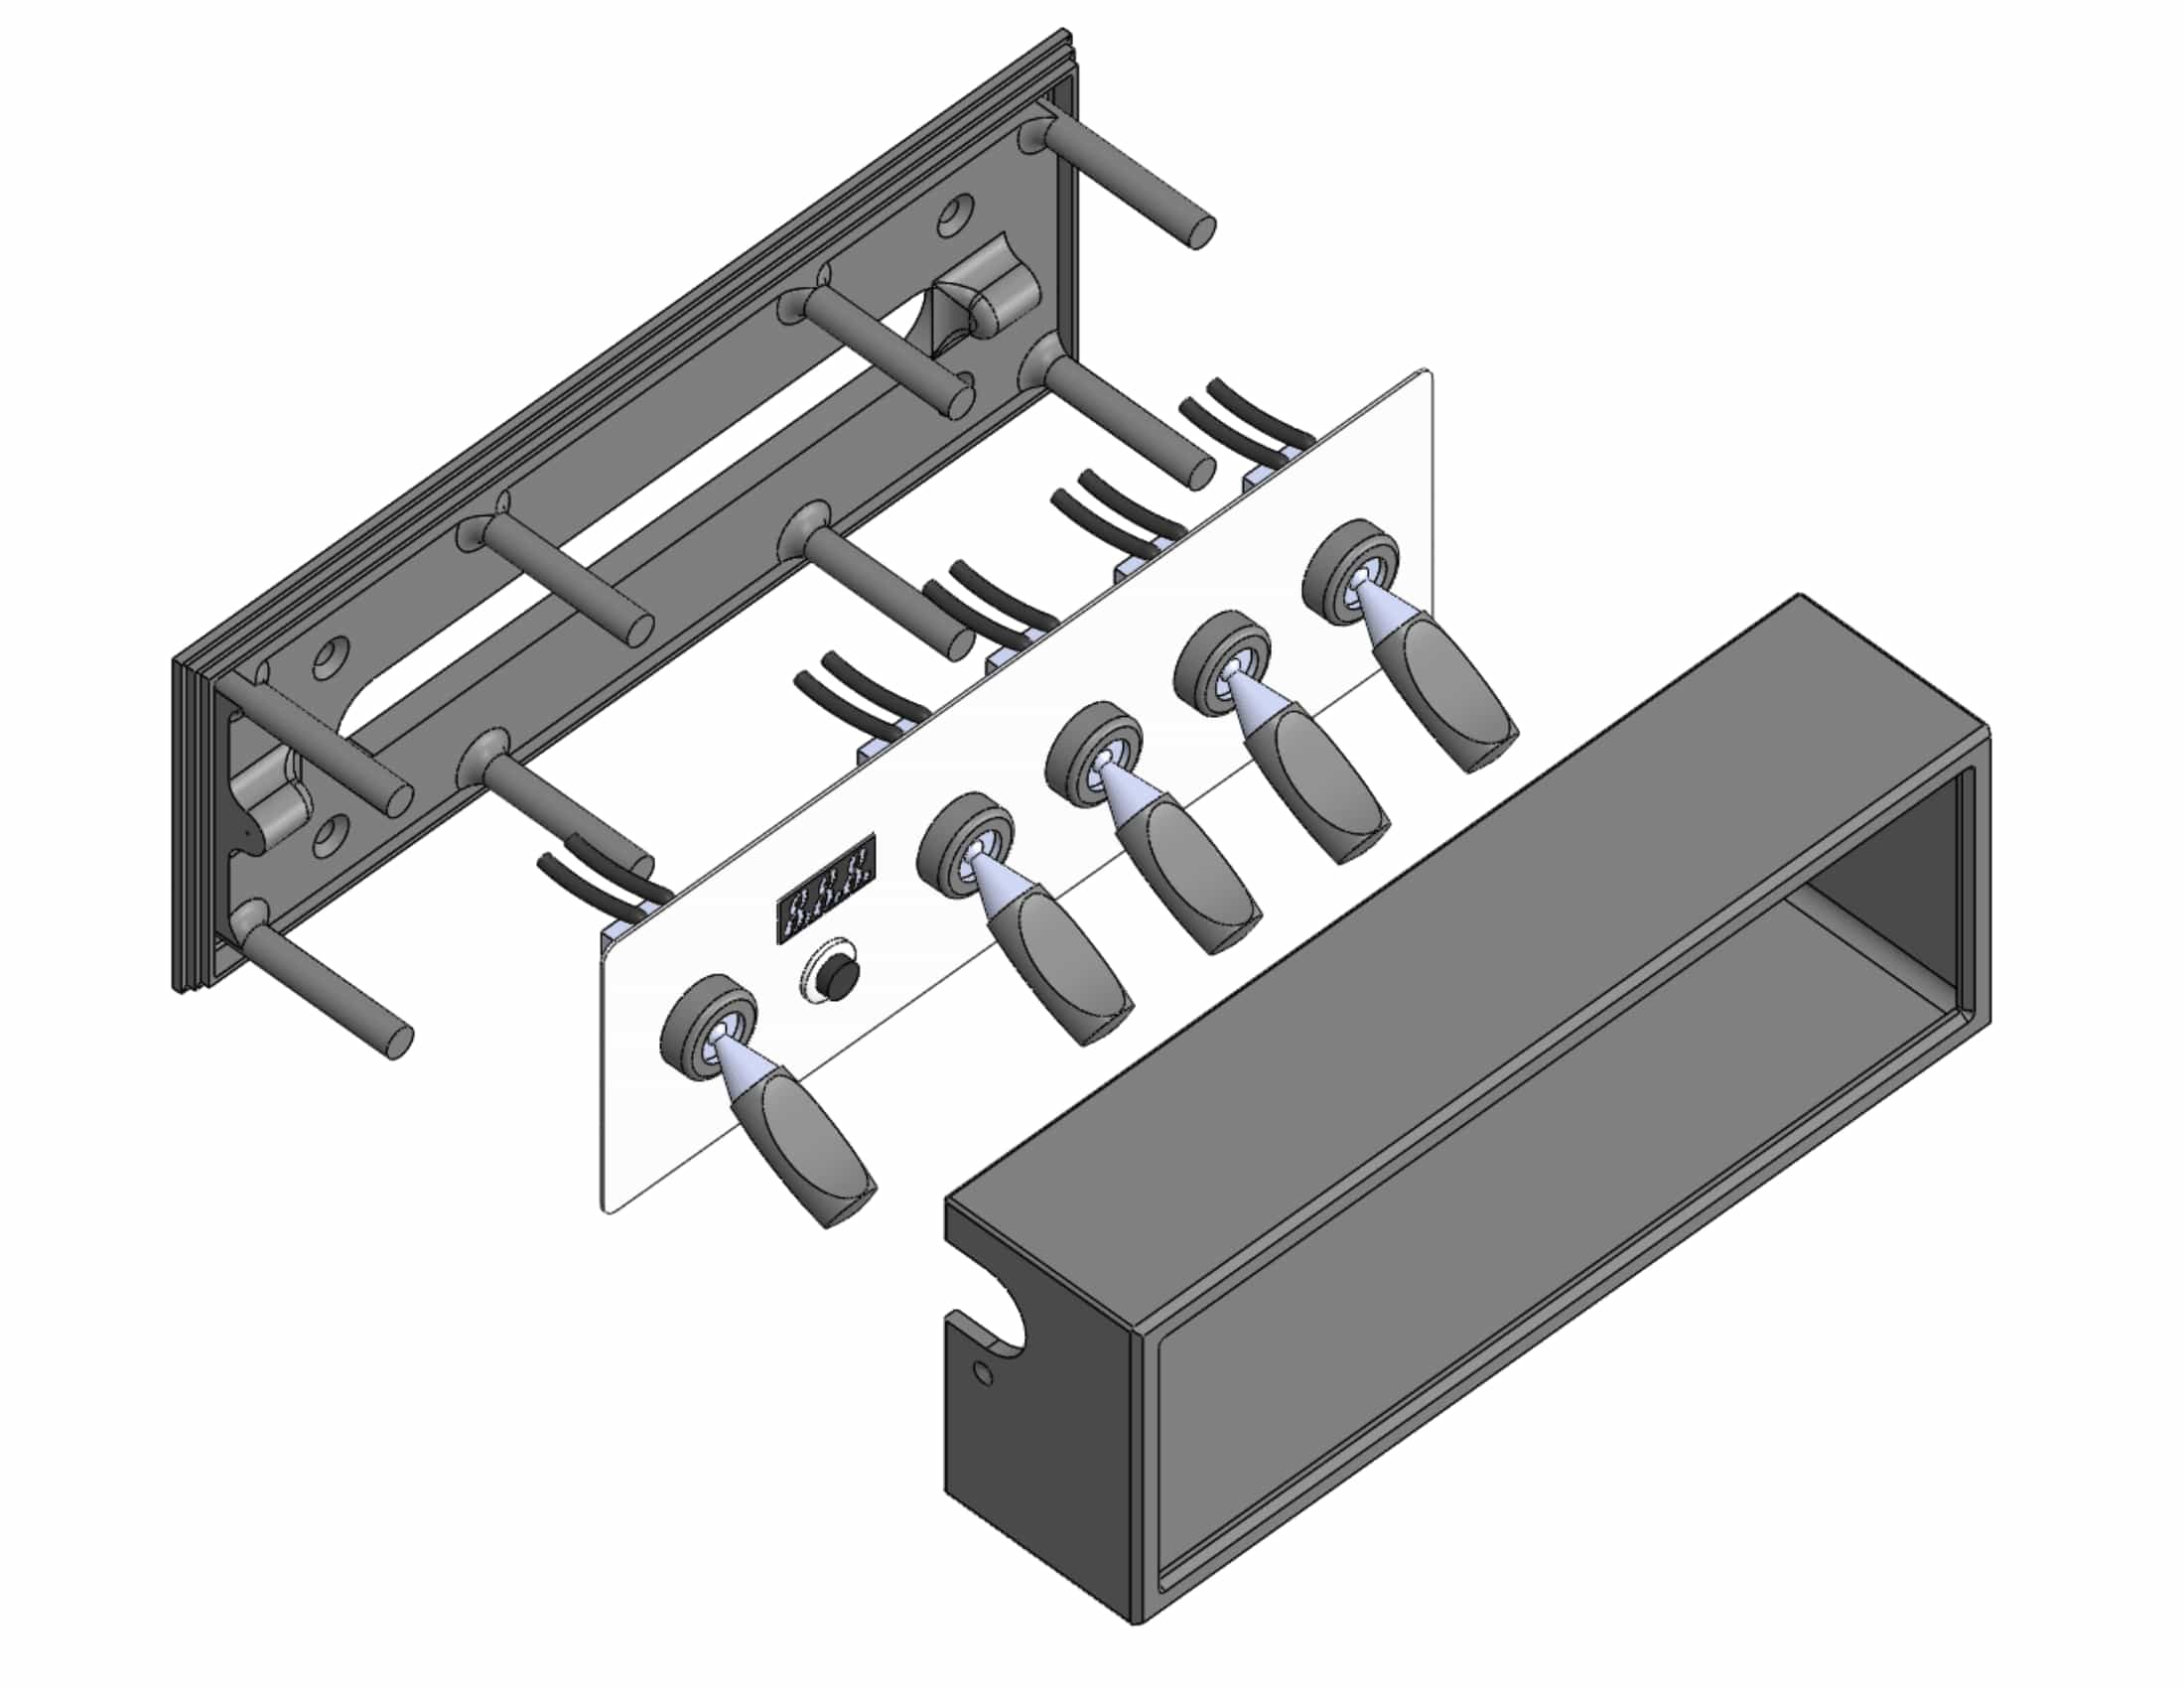
We 3D printed up the two models, and I have to say that they turned out really nicely!
For the faceplate, we drilled and cut holes in a sheet of aluminum cut to size. In addition to the five switches (master, inverter, and 3 lights), we added a voltage indicator, gated behind a pushbutton (possibly showing 12.2V in the image below).
We mounted this against the back of the bulkhead behind the driver’s seat. A piece of surface mount conduit runs the wires neatly down to the electronics cabinet under the counter.
| Component | Quantity | Cost Each | Total |
|---|---|---|---|
| DPDT Switch for master | 1 | $3 | $3 |
| SPST Switches | 4 | $4 | $16 |
| 3D printed parts | 2 | $2 of filament | $4 |
| Aluminum for faceplate | <1/4 sheet | $10 | $2 |
Conclusion
Not included in the price tally are things I had laying around: a lot of smaller ring and spade terminals, quite a bit of wire, the filament for the 3D prints, a battery, the fan, some Romex and an outlet box, and the fridge (if that ever gets purchased).
| Component | Quantity | Cost Each | Total |
|---|---|---|---|
| 5 meter LED Strips | 2 | $14 | $28 |
| LED Dimmer | 1 | on hand | – |
| Meanwell TS-400 Inverter | 1 | $155 shipped | $155 |
| 12V outlets (2pk) | 1 | $11 | $11 |
| GFCI outlet | 1 | $10 | $10 |
| 120V outlets | 2 | $13 | $26 |
| Latching relay | 1 | $49 | $49 |
| Fuse block | 1 | $14 | $28 |
| 120A charging relay | 1 | $12 | $12 |
| Fuse tap | 1 | $6 | $6 |
| DPDT Switch for master | 1 | $3 | $3 |
| SPST Switches | 4 | $4 | $16 |
| 3D printed parts | 2 | $2 of filament | $4 |
| Aluminum for faceplate | <1/4 sheet | $10 | $2 |
| Total: | $350 |
In total, the lights use just nearly 15A at full capacity, and about 2A for the section over the sink. The fan uses about an ampere depending on its setting, and the inverter uses 1.25A + (output power/80% efficiency). This means that in a reasonable setting, he may use the full lights for an hour or so for dinner, use dim lighting and an inverter to run a laptop for the rest of the evening, and run the fan overnight and for part of the day. If he has a 100Ah battery, this means he burns through about 2/3 of his capacity per day. Not too shabby!
(However, he can’t just drive 15 minutes and expect his battery to be fully charged. Even if he’s dumping the entire output of a 100A alternator into that battery, it’ll take a full hour of driving (with no fans, headlights, wipers, …) to recharge fully.)
| Component | Hours | Current | Total |
|---|---|---|---|
| Full lighting | 1h | 15A | 15Ah |
| Sink lighting | 4h | 2.5A | 10Ah |
| Laptop5 | 4h | 5.5A | 22Ah |
| Vent fan | 18h | 1A | 18Ah |
| Total: | 65Ah |
More photos are available here: https://photos.app.goo.gl/S572cH4zuhniNh9e9
Happy trails, Isaac!

-
He’s using a Maxair 00-04000k, which seems to work pretty well. I didn’t really do anything for this other than to hook it up to power, so I won’t go into much detail here. ↩︎
-
While we were doing work on the van, we left a battery tender connected to the vehicle’s battery. This means that the battery was slowly discharging while the lights were in use, and slowly charging while they weren’t. ↩︎
-
Heh. ↩︎
-
I spent way too long trying to figure out what to call these! Wikipedia’s article says
An automobile auxiliary power outlet (also known as car outlet, automotive power socket, automobile outlet, vehicular outlet, and similar; formerly known as a cigarette lighter receptacle, cigar lighter receptacle or cigar lighter socket)…
Looks like I’m not the only one with a few names for these guys! ↩︎
-
Say his laptop uses 40W (though this is probably high for a non-gaming laptop). The 80% efficient inverter then uses 50W plus its 15W quiescent draw, for a total of 65W, or something like 5.5A. ↩︎