A friend and I recently uncovered a 1992-ish PC, boasting 4MB of RAM, a nearly 500MB hard disk (aftermarket, we believe), and a dual 5.25/3.5″ floppy drive! Stymied by the lack of a compatible mouse (as this was well before the era of USB devices), we could boot from it, but not operate it. So after wondering for a bit what we could possibly do with it, we decided to take out the floppy and try to adapt it for a modern computer.
Of course, there do exist USB floppy controllers; however, as any enterprising computer science students would, we wanted to build our own.
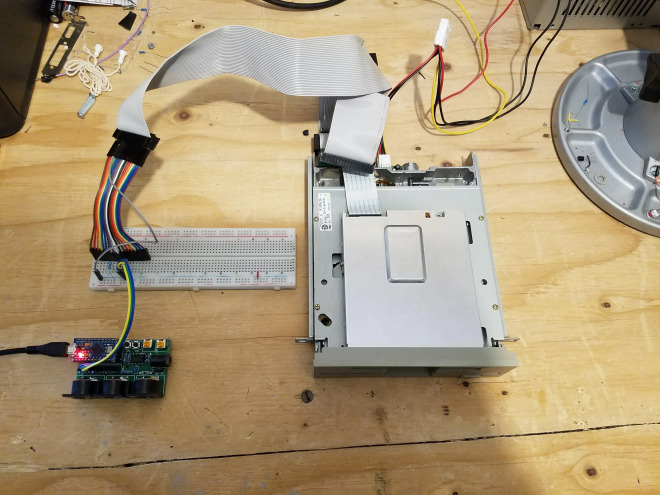
We started by breadboarding some circuitry along the breakout of the floppy ribbon cable.

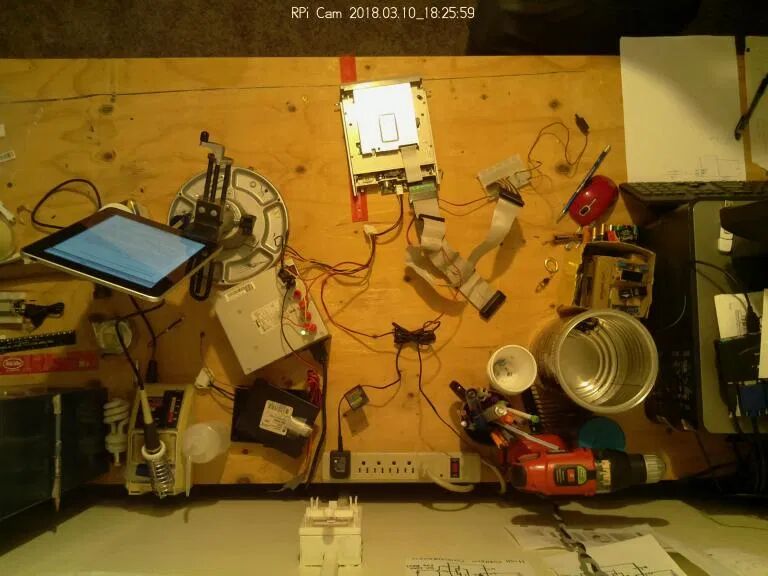
With some knowledge of the pinout—check it out on the iPad in the image!—and the fabulous documentation available at https://www.hermannseib.com/documents/floppy.pdf, we started building the simplest circuit we could. Since we didn’t have an actual floppy disk on hand, as far as we can tell we couldn’t run the drive motor. (If this isn’t the case, drop us a line!) Instead, we found we could step the head in and out one track at a time using only the “Drive Select”, “Step”, and “Direction” pins. After we figured this out using buttons, we wanted to push the limits of this technology. We wrote a quick Arduino sketch that started at 1 track per second and increased the frequency with a button press.
We found that the drive would work fine in excess of 400 tracks per second. But what we also found was that (possibly unsurprisingly) it would emit tones at the frequency it was being pulsed. So a plan was born.
Source code
Also available at https://github.com/ChandlerSwift/FloppyMIDI/blob/master/FloppyMIDI-USB.ino
#include "MIDIUSB.h"
#include <math.h> // for pow
#include "list.h"
const int directionPin = 2;
const int stepPin = 3;
const int floppyChannels[] = {4,5};

// https://www.midi.org/specifications/item/table-1-summary-of-midi-message
const byte midiNoteOff = B10000000;
const byte midiNoteOn  = B10010000;

// https://www.midikits.net/midi_analyser/midi_note_numbers_for_octaves.htm
// C_3 to C_6
const int rangeMin = 48;
const int rangeMax = 84;


midiEventPacket_t midiPacket;
// byte midiChannel;
byte midiCommand;
List<byte> nowPlaying;
// byte volume;

int headPosition [] = {0,0}; // Starts at 0 for each drive
const int numTracks = 80;
bool forward = false; // what direction are we going?


// https://pages.mtu.edu/~suits/NoteFreqCalcs.html
float calcFreq(int note) {
  int n = note - 69; // 69 is A4
  int f0 = 440; // 440 is freq of A4
  float a = pow(2, 1.0 / 12.0);
  return f0 * pow(a, n);
}


List<float> notePeriodsOrig; // This one is held constant as long as the notes remain unchanged
List<float> notePeriods; // This one changes every iteration of loop()

void setup() {
  pinMode(directionPin, OUTPUT);
  digitalWrite(directionPin, forward);

  pinMode(stepPin, OUTPUT);
  digitalWrite(stepPin, HIGH);

  for (int pin: floppyChannels) {
    pinMode(pin, OUTPUT);
    digitalWrite(pin, HIGH); // Disable by default
  }

  Serial.begin(9600);
}

void loop () {

  midiPacket = MidiUSB.read();
  if (midiPacket.header != 0) {

    // Serial.println(midiPacket, BIN);
    midiCommand = midiPacket.byte1 & B11110000; // 4 most significant bits
    // midiChannel = midiPacket & B00001111; // 4 least significant bits

    if (midiCommand == midiNoteOn) {
      if (midiPacket.byte2 >= rangeMin && midiPacket.byte2 <= rangeMax) {
        nowPlaying.append(midiPacket.byte2);
        // Add new note to frequencies
        float period = 1.0/calcFreq(midiPacket.byte2);
        // Append period to peroid lists
        notePeriodsOrig.append(period);
        notePeriods.append(period);
        // volume = midiIn.read(); // TODO
      }
    } else if (midiCommand == midiNoteOff) {
      if (nowPlaying.in(midiPacket.byte2)){ // Make sure it's a note we care about
        int index = nowPlaying.index(midiPacket.byte2);
        // Remove that value from all the parrell lists
        nowPlaying.pop(index);
        notePeriodsOrig.pop(index);
        notePeriods.pop(index);
      }
    }
  }

  if (nowPlaying.getLength() > 0) {
    // limits
    float minimum = notePeriods.minimum();
    int minIndex = notePeriods.index(minimum);
    digitalWrite(floppyChannels[minIndex], LOW);


    // Calculate which direction to move the head.
    if (headPosition[minIndex] >= numTracks) {
      forward = true;
      digitalWrite(directionPin, LOW);
    }
    else if (headPosition[minIndex] <= 0) {
      forward = false;
      digitalWrite(directionPin, HIGH);
    }


    for (int i = 0; i < notePeriods.getLength(); i++) {
      notePeriods[i] -= minimum;
    }

    // Reset that period back to full length because we have to wait
    // another full period before it plays again
    notePeriods[minIndex] = notePeriodsOrig[minIndex];


    // step
    digitalWrite(stepPin, LOW);
    delayMicroseconds(20);
    digitalWrite(stepPin, HIGH);
    delayMicroseconds(20);
    headPosition[minIndex] += (forward ? -1 : 1);
    digitalWrite(floppyChannels[minIndex], HIGH);
    delayMicroseconds(minimum*1000000*2);

  }

}
This uses the MIDI Arduino board I’ve used for a few other projects. It takes MIDI in over USB1 and if it’s in the range it handles, plays the floppy drive, one note at a time. (Ideas on polyphony, anybody?)
Since we use USB, we use SendMIDI to,
well, send MIDI to the device to play. Currently, we send single track MIDI to
play melodies like this recognizable one
(full res on YouTube):
For this project, we took great inspiration from Return of the Floppies—I highly recommend you read it; it’s great!
-
We initially started this project using hardware midi so we could hook this up to any MIDI controller (the Pedalboard perhaps?) to make music. However, we determined there are likely hardware issues with the board that prevent us from doing this. We’re still attempting, so look for it in a future iteration! ↩︎

